Pages

Foodie Blogroll

Friday, September 30, 2011

All The Rage Bolognese

Slow Simmered Sauciness
The last time I was in France I had a delicious dinner of  baked polenta topped with a divine bolognese sauce at a local cafe .This Hungry Girl recipe, while not "traditionally made" still creates a sauce that's very similar in flavor in a way that's healthy and easy. It simmers in a crock pot for hours to create a complex flavor, not to mention fill your house with an unbelievable aroma as it cooks.. I poured the sauce over polenta but you could use it on pretty much anything.

All The Rage Bolognese
Gluten Free
Makes 2 Servings

1 (14.5 oz) can crushed tomatoes
1 tbsp. double concentrated tomato paste
1 garlic clove, minced
1/2 tsp. balsamic vinegar
1/4 tsp. Worcestershire sauce
1/4 tsp. dried oregano
1/4 tsp dried basil
dash crushed red pepper
1/2 cup diced tomatoes, lightly drained
1/2 small carrot, finely chopped
1/4 medium onion, finely chopped
1/2 bell pepper (any color), finely chopped
4 oz. lean ground turkey
salt

1. In a large bowl, combine crushed tomatoes, tomato paste, garlic, balsamic, Worcestershire sauce, oregano, basil, crushed red pepper, and diced tomatoes. Stir until thoroughly mixed and set aside.

2. Place turkey in the bottom of the crock pot and sprinkle with salt. Mix well with hands to break up meat and distribute salt. Add tomato mixture to crock pot and stir gently. 

3. Cover and cook on high for 3-4 hours or on low for 7-8 hours. Once cooked, stir thoroughly and serve.

Nutrition Information--approximately 150 calories per serving

Tuesday, September 27, 2011

Spicy Shrimp Jumbalaya

Creole Cooking
This delightful Hungry Girl jumbalaya will transport you straight to Louisiana.The soup is so good no one will even notice how healthy it is. It's brimming with shrimp, rice, vegetables, and scrumptiousness. Did I mention that you make it all in one pot? Yep, just toss the ingredients in a pot, cover, and simmer to perfection.

Spicy Shrimp Jumbalaya
Gluten-Free
Serves 4


2  (3 oz) links fully cooked chicken sausage, cut into half moons ( I like the kind by Al Fresca)
2 (14.5 oz) cans diced tomatoes
1 green bell pepper, seeded and chopped
2 cups low-sodium chicken broth
1/2 cup uncooked brown rice
1 clove garlic, minced
1 tsp. Cajun seasoning
1/2 tsp hot sauce, or more to taste
1/4 tsp dried oregano
1/4 tsp dried thyme
20-24 raw shrimp, tails removed and deveined
salt and pepper

1. Add all ingredients except shrimp to a large pot on the stove. Mix thoroughly and bring to a boil.

2. Reduce heat to medium low and cover the pot. Simmer until vegetables are tender and rice is fluffy, about 35 minutes.

3. Add shrimp and recover the pot. Cook until shrimp are cooked through, 5-7 minutes.

4. Season with salt and pepper.

Nutrition Information--approximately 260 calories

Butternut Squash Grilled Cheese

Sandwich Heaven
This is my version of a Food Network Magazine recipe from "The Sandwich King", Jeff Mauro. When I saw the recipe for the first time, I knew I had to make it since it includes some of my favorite ingredients- roasted squash, caramelized onions, & cheese! The sandwich is creamy and gooey with the perfect hint of sugar and spice.

Butternut Squash Grilled Cheese
Gluten Free
Makes 1 Sandwich


1 tbsp. Promise butter spread, divided
4 thin round slices of butternut squash (cut the neck of squash from the bell and reserve bell portion for later, peel the narrow end of the squash and slice 4 slices off tip)
2 tsp sugar-free maple syrup
1/4 tsp chili powder
salt and pepper
1/4 of a medium onion, thinly sliced
1/4 cup low sodium chicken broth
1 tbsp. balsamic vinegar
dash of  Truvia
2 slices gluten-free sandwich bread
1 slice fat-free cheddar cheese
1 mozzarella light Laughing Cow wedge, room temperature

1. Preheat oven to 425 degrees. Line a small baking sheet with aluminum foil and spray with nonstick spray.

2. In a small bowl, toss squash slices with maple syrup, chili powder, salt, and pepper. Transfer to baking sheet.

3. Roast squash 20-22 minutes or until tender. Set aside and let cool.

4. Melt 1 tsp. Promise in a medium skilled over medium-low heat. Add onion and toss to coat. Cook until onions begin to develop a deep brown color. When bottom of the pan begins to look brown, deglaze with a splash of chicken broth (every 5-8 minutes).

5. Stir in balsamic vinegar, sugar, and salt (to taste). Cook, stirring frequently, until onion mixture becomes very sweet. Deglaze bottom of pan if necessary.

4. Place bread slices on a clean, dry surface. Spread one tsp. of butter on each slice of bread, then flip bread so butter side faces down. Spread 1/2 a wedge of Laughing Cow on each slice of bread (on the reverse side from the buttered side).

5. Place squash rounds on one slice of bread on top of Laughing Cow. Top with caramelized onions, and than cheddar cheese. Close with the other slice of bread, buttered side facing out.

6. Heat a small saute pan sprayed with nonstick spray over medium heat. Place sandwich in skillet and cook 3-4 minutes per side, or until golden  and cheese is melt-y.

Nutrition Information--approximately 185 calories per sandwich

Monday, September 26, 2011

Oatmeal Update

Have you ever wanted to have creme brulee for breakfast? Well maybe not but this recipe is sheer brilliance that you must try. The "creme brulee" is super creamy & it's perfect for a cold, rainy morning when you need something warm and comforting. I was inspired by a recipe for baked oatmeal I saw in Women's Health magazine. If you're in a hurry you can skip the broiler step and just stir the Truvia into the batter but it's way more fun to have a caramelized sugar crust!

Oatmeal Creme Brulee
Gluten-Free
Makes 1 serving


1/4 cup gluten free regular oats (such as Bob's Red Mill)
3 tbsp pumpkin puree
1 tbsp liquid egg substitute
1/4 cup Silk unsweetened almond milk
1/4 tsp baking powder
dash of salt
1/4 tsp pure vanilla extract
1/8 cup water
1 tbsp. sugar-free maple syrup
1 tsp. cinnamon
1 packet Truvia

1. Preheat oven to 350 degrees. Spray a 9 oz. ramekin with nonstick spray.

2. Combine all ingredients except for Truvia in a small bowl. Pour batter into ramekin.

3. Bake in oven for 17-20 minutes or until crust begins to form on top and sides begin to bubble. Remove dish from oven. Sprinkle top of oatmeal evenly with Truvia.

4. Switch oven off and turn on broiler as high as it will go. Place ramekin under broiler for 6-8 minutes or until Truvia begins to caramelize and turn a deep golden brown.

Nutrition Information--approximately 125 calories per serving

Sunday, September 25, 2011

Eggplant- The Sequel


I  decided to make a Ratatouille Foil Pack tonight to use up the leftover eggplant from the Saucy Eggplant Tower. With traditional ratatouille, you have to babysit the vegetables over the stove but with this Hungry Girl recipe, you simply throw it in the oven for a half hour. The easier method still creates a unbelievable medley of vegetables smothered in tomato-y goodness. This makes a large serving that can be eaten on its own or served over polenta or miracle noodles. It will taste great on anything!

Ratatouille Foil Pack
Gluten Free
Makes 1 Large Serving


1 cup eggplant, chopped
1/2 cup red bell pepper, chopped
1/2 cup zucchini, sliced into thin half moons
1/2 cup canned diced tomatoes, drained
1/2 small onion, coarsely chopped
1/4 cup tomato paste
2 tbsp fresh basil, chopped
1 clove garlic, minced
dash of crushed red pepper flakes
salt and pepper
Chop up the veggies
Stir it up
Fold up the packet for baking
Unwrap the deliciousness!

1. Preheat oven to 375 degrees.

2. In a medium bowl combine all ingredients until thoroughly coated in tomato. Set aside.

3. Large a large piece of aluminum foil on a rimmed baking sheet. Spray with nonstick spray. Spoon vegetables into center of the foil. Fold in edges to form a tightly sealed packet (place another piece of aluminum foil on top if necessary).

4. Bake in oven for 30-32 minutes or until vegetables are tender. Allow to cool a few minutes before unwrapping. Be careful when opening- there will be steam!

Nutrition Information-- approximately 168 calories, 0.5 g fat, 682 mg sodium, 37.5 carbs, 10.5g fiber, 7g protein

Saturday, September 24, 2011

Eggplant Extravangsa

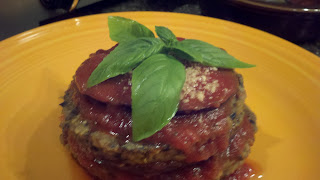
This is a Hungry Girl recipe from her amazing TV show. The eggplant tower looks extremely elegant but is actually quite easy to put together. This recipe is a great way to dress frozen burgers in a way that is quick but also tasty.

Saucy Eggplant Tower
Gluten Free
Makes 1 Serving


2 frozen veggie burger patties (eggplant burgers are ideal; check for gluten)
1 eggplant (about the same width as burger patties)
1/2 cup crushed tomatoes
1/4 tsp Italian seasoning
crushed red pepper flakes, to taste
1 tsp. grated Parmesan cheese
salt and pepper
fresh basil, to garnish

1. Preheat grill pan (or small skillet sprayed with nonstick spray) to medium heat.

2. Slice 3 rounds off the thick end of the eggplant (discarding the very bottom). You want the slices to be as close to the size and width of burger patties as possible. Season eggplant with salt.

3. Place eggplant slices and burger patties on grill. Cook about 4 minutes per side or until fully cooked.

4. Pour crushed tomatoes into a small microwave safe bowl and stir in seasonings. Cover and microwave about  30 seconds or until hot.

5. Place one eggplant slice on plate. Evenly top with a spoonful of sauce and then top with a burger patty. Spoon sauce on top of burger and repeat- eggplant, sauce, patty, sauce, eggplant. Pour the remaining sauce on top and sprinkle with Parmesan cheese. Garnish with fresh basil.

Nutrition Information--approximately 280 calories per serving

Friday, September 23, 2011

Eat Your Vegetables

This recipe was inspired by a dish I saw Giada DeLaurentiis make on a vegetarian themed episode of her show. I switched out the spaghetti for spaghetti squash (which makes it even creamier!) and lightened up the cream sauce with the help of Laughing Cow. It's packed with vegetables which make the serving size huge but it's so scrumptious you will still want to scrape the bowl clean!

Roasted Spaghetti Squash with Vegetable Cream Sauce
Gluten Free
Makes 1 Large Serving


1 small spaghetti squash
4 oz Brussels sprouts, thinly sliced (about 5-6)
4 oz mushrooms, chopped (about 8-10)
1/4 onion, finely chopped
1 clove garlic, minced
2 mozzarella, sundried tomato, and basil light Laughing Cow wedges, cut into small pieces
1/8 cup light mozzarella cheese, shredded
1/4 cup low sodium chicken broth (check for gluten)
1 teaspoon lemon juice
salt and pepper

1. Preheat oven to 450 degrees. Line a baking sheet with aluminum foil and spray with nonstick spray.

2. Carefully cut spahgetti squash in half lengthwise and scoop out the seeds. Season with salt and pepper and place cut side down on baking sheet.

3. Roast squash for forty five to fifty minutes or until tender.

4. Meanwhile to make the sauce, heat a large pan sprayed with nonstick spray to medium high heat.  Add the Brussels sprouts, onion, mushrooms, garlic, salt and pepper. Cook, stirring occasionally, until onions are soft (6-8 minutes).

5. Add the Laughing Cow cheese, vegetable broth, and lemon juice. Bring sauce to a summer and stir until a creamy sauce is formed (about 2 minutes). Season with salt and pepper.

6. Once spaghetti squash is cool enough to handle, use a spoon to scoop out the flesh into a medium sized bowl. Toss "noodles" with mozzarella cheese. Pour sauce over noodles.

Nutrition Information--approximately 250 calories per serving

Thursday, September 22, 2011

Fall into Flavor

I created this recipe when I needed a dessert for an Fall themed dinner party. The recipe base is actually a banana bread from Bethanny Frankel that I revamped to become Autumn Spice Bread. What's great about this recipe is you only use one bowl and all the ingredients are added at one time.The bread turned out amazing with a combination of ginger, nutmeg, cinnamon, pumpkin, carrots and more. Plus the bread is so moist its reminiscent of cake.

Autumn Splendor Bread
Gluten Free
Makes 1 Loaf


1 cup all purpose gluten free flour
3/4 cup Truvia sweetner
1/4 cup brown sugar
1 cup pumpkin puree
1/4 cup liquid egg substitute
1 cup carrots, shredded
1 tablespoon butter, room temperature
1 tsp. pure vanilla extract
3/4 tsp baking powder
3/4 tsp baking soda
1/4 tsp salt
2 tsp cinnamon
1/4 tsp nutmeg
1/4 tsp ginger
dash of cloves

1. Preheat oven to 350 degrees. Cut a piece of parchment paper and place in the bottom of a loaf pan. Spray with nonstick spray.

2. Combine all of the ingredients in a large bowl and mix well.

3. Pour batter into loaf pan and tent loosely with foil. Bake for 30 minutes than remove foil and bake for 25-28 minutes more. Bread is done when cake tester inserted in center comes out almost clean (moist crumbs are okay). Cool completely on cooling rack before slicing.

Nutrition Information--approximately 70 calories per slice (1/12 of loaf)

Wednesday, September 21, 2011

Roll Up the Goodness

Tired of the same, old boring chicken? Time for a chicken makeover! For this Hungry Girl recipe, chicken is rolled up with a cheesy, spinach mixture, topped with tomato sauce and more cheese, and then baked to perfection. It's one of those recipes that's super easy to accomplish but will impress everyone you serve it to.

Three-Cheese Chicken Cannelloni
Gluten-Free
Makes 2 Servings


1/4 cup frozen chopped spinach
1/4 cup finely chopped mushrooms
1/3 cup fat-free ricotta cheese
2 teaspoons grated Parmesan cheese
1 clove garlic, minced
dash ground nutmeg
salt and pepper
2 (5 oz) raw boneless skinless chicken breast
3/4 cup canned crushed tomatoes
1/4 tsp garlic powder
1/4 tsp basil
1/4 tsp Italian seasoning
1/4 cup reduced fat mozzarella cheese, shredded

1. Preheat oven to 350 degrees. Spray a baking dish with nonstick spray and set aside.

2. Lay one piece of chicken on a cutting board between 2 pieces of plastic wrap. Use a meat mallet to pound chicken until about 1/3 inch thick. Repeat with second piece.

3. Place spinach and mushrooms in a microwave safe bowl. Microwave for 1 minute or until softened. Blot thoroughly, removing excess liquid. Add ricotta cheese, parmesan, garlic clove, nutmeg, and a dash of salt and pepper. Stir well and set aside.

4. Season chicken with salt and pepper. Lay on a clean, flat surface and evenly spread veggie/cheese mixture between two pieces. Starting with a longer side, roll up one cutlet and place seam side down in baking dish. Repeat with second piece of chicken.

5. Cover dish with foil and bake in oven for 20 minutes.

6. Meanwhile, combine tomatoes and seasonings (garlic powder, basil, Italian seasoning) in a small dish.

7. Remove chicken but leave oven on. Take the foil off baking dish and spoon tomato sauce over chicken. Sprinkle with mozzarella.

8. Return to oven and bake, uncovered, until chicken is cooked through and cheese is melted (about 15 minutes).

Nutrition Information-- approximately 274 calories per serving (1 stuffed cutlet)


Tuesday, September 20, 2011

Faux Fast-Food

These mini chicken bites taste even better than what you might find at the drive-thru. The always useful Chex crumbs provide a golden, crispy coating without having to resort to frying. Finishing the chicken bites with a coating of hot sauce creates the perfect sticky and spicy glaze.


Buffalo Chicken Bites
Gluten Free
Makes 1 Serving

5oz boneless skinless chicken breast, cut into bite size chunks (about 8)
1/2 cup corn chex cereal
1/4 tsp garlic powder
1/8 tsp cayenne (or more if you want chicken to be spicier)
sprinkle of salt and pepper
1/4 cup liquid egg substitute
2 tbsp promise butter spread
2 tbsp Frank's buffalo hot sauce

1.Preheat oven to 350 degrees. Line small baking sheet with aluminum foil and spritz with nonstick spray

2. Place chex in a small food processor along with garlic, salt, pepper, and cayenne. Grind to a breadcrumb like consistency.

3. Pour egg substitute into a shallow bowl and place chex crumbs in a separate shallow bow. Dip a chicken piece in egg liquid, then coat in crumbs. Place gently on baking sheet. Repeat with remaining pieces.

4. Spray tops of chicken lightly with nonstick spray and place in oven. Bake for egiht minutes then remove pan from oven but leave on. Carefully flip pieces and then spray with nonstick spray. Return to oven and bake for 5-8 minutes or until chicken is cooked through.

5. While chicken is cooking, place butter spread in a small dish and microwave for 15 seconds. Whisk in hot sauce.

6. Once chicken is cooked, toss chicken pieces in hot sauce mixture.

Nutrition Information--approximately 250 calories per serving

Monday, September 19, 2011

Risotto Makes the World Go Round

Is there anything in the world better than a bowl of creamy, delightful risotto? I think not! This recipe from Women's Health magazine adds in pumpkin for a twist on the classic risotto.Once again, pumpkin makes a traditional recipe even better, leading to an unparalleled risotto dish.

Pumpkin Mushroom Risotto
Gluten Free
Serves Four


5 cups low sodium chicken broth
1 tbsp olive oil
2 cloves garlic
1 cup arborio rice
1 cup sliced mushrooms
1/2 cup dry white wine
3/4 cup pure canned pumpkin puree
3/4 cup + 4 tsp shredded Parmigiano Reggiano cheese
salt and pepper
dried thyme, to taste

1. Heat broth in a saucepan until boiling, then reduce to simmer. Maintain simmer.

2. Heat 1 tbsp olive oil in large saucepan over medium high heat. Add garlic and cook until fragrant about 30 seconds.

3. Add rice and cook about two minutes, stirring until rice is thoroughly coated with oil.

4. Add mushrooms and wine and cook, stirring until most of the liquid is evaporated, 2-3 minutes.

5. Add 1 cup of broth and cook, stirring until most of the liquid is evaporated, 2-3 minutes.

6. Continue to add broth 1/2 cup at a time, stirring until liquid is almost evaporated after each addition. Keep adding broth until rice is creamy but still al dente (17-18 minutes).

7. Stir in pumpkin, 3/4 cup cheese, salt, pepper, and thyme. Cook 1-2 minutes. Divide risotto among 4 bowls and top each with 1 tsp cheese.

Nutrition Information-- Approximately 240 calories per serving

Sunday, September 18, 2011

Stir-Fry Fun

This recipe from Rocco DiSpirito is a delicious and versatile recipe. It's a blank slate  that you can add in whatever protein or vegetables you may have on hand (I added in some bell peppers tonight). The reason I decided to post this recipe is the amazing sauce. The Rockin' Asian Stir-Fry Sauce could make cardboard taste great. Be sure to have all your ingredients prepped before you begin because once you start, the stir-fry is ready in minutes!

Shrimp & Asparagus Stir-Fry
Gluten-Free
Makes 4 servings


1 tbsp toasted sesame oil
1 medium onion, sliced thinly
1 large bunch asparagus, cut into 1 inch pieces
1 pound large shrimp, peeled and deveined
2/3 cup Rockin' Asian Sir-Fry Sauce (recipe below)
1/2 cup chopped fresh basil
salt and pepper

1. Heat a large nonstick saute pan over high heat. Once the pan is hot, add seasame oil,  then add onion and asparagus (plus any other vegetables you may be using). Stir-fry until the vegetables are tender (about 5 minutes).

2. Season the shrimp with salt and pepper. Add to pan and cook about 3 minutes, stirring constantly. Pour in stir-fry sauce. Once shrimp are cooked and the sauce is heated through, stir in basil. Season with salt and pepper.

Nutrition Information--approximately 198 calories per serving, 21g protein, 14g carbs, 3g fiber, 886 mg sodium

Rockin' Asian Stir-Fry Sauce
Makes 1.75 cups

1 tbsp toasted sesame oil
1/4 cup chopped fresh ginger
6 garlic cloves, minced
1/2 bunch scallions, chopped finely
1 tablespoon cornstarch
6 tbsp. gluten free soy sauce
3/4 cup low-sodium chicken broth (check for gluten)
3 tbsp rice vinegar
1/2 cup ketchup (check for gluten)
salt and pepper

1. Place cornstarch in a medium bowl. Add in soy sauce, chicken broth, rice vinegar & ketchup. Whisk until thoroughly blended.

2. Heat a large nonstick saute pan over high heat. Once pan is hot, add the sesame oil. Add in garlic, ginger, and scallions. Saute until fragrant about 2 minutes, stirring frequently.

3. Whisk the cornstarch mixture into saute plan and bring sauce to simmer. Reduce heat to medium and simmer, whisking constantly. Once sauce has thickened (about 2 minutes) season with salt and pepper.

4. Transfer sauce to a large bowl and use immersion blender to blend until smooth (or pour carefully into traditional blender).

*Sauce can be kept in refrigerator for up to 1 week*

Saturday, September 17, 2011

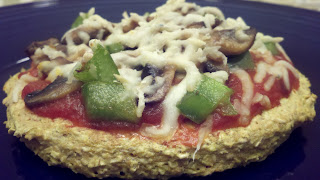
Cutest Pizza Ever

This is another genius recipe from Hungry Girl that gives you an extraordinary homemade pizza in a half hour. The best part is that  I only had to make a few changes to transform it to be gluten-free (had to add miraculous chex again!). Feel free to top it with any veggies or toppings you have on hand. I've made it before with items such as jalapenos and walnuts (trust me, it works).

Oat Crust Pizza
Gluten Free
Makes 1 Mini Pizza


1/4 cup corn chex
1/4 cup regular oats
1/4 cup liquid egg substitute
one tbsp diced mushrooms
one tbsp diced green pepper
1/4 cup crushed tomatoes
1/4 cup reduced fat shredded mozzarella
garlic powder
salt and pepper
crushed red pepper flakes

1. Preheat oven to four hundred degrees.

2. Place oats and chex in a small food processor (or blender) and grind until they have a bread crumb like consistency. Transfer crumbs  to a small bowl and stir in egg substitute and garlic powder. Be sure ingredients are mixed well.

3. Spray a medium pan with nonstick spray and bring to medium-high heat. Spoon oat mixture into pan and use back of spoon to smooth into circular crust. Cook about two minutes (until lightly browned) and than
flip carefully using a spatula. Cook the second side about 2 minutes more (also until lightly golden) and then transfer crust to a plate to cool.

4. Remove pan from heat and respray with nonstick spray. Place pan over heat again and add in mushrooms and peppers. Saute over medium-high heat about 2 minutes.

5. Season tomatoes with garlic powder, salt and pepper, red pepper flakes and any other desired seasonings. Spread evenly over crust than place veggies on top of sauce. Sprinkle evenly with mozzarella cheese.

6. Carefully place small square of aluminum foil on oven rack then place pizza directly on foil. Bake pizza for 10 minutes. Cut into quarters and enjoy!

Nutrition Information-- approximately 235 calories (per pizza)

Side Dish Surprise

It's the season for squash so I'm always on the lookout for new ways to use them. I saw the following recipe in an issue of Vegetarian Times. It pairs squash, red onion, and sunchokes which are all roasted together until golden and scrumptious.  I've never worked with sunchokes before (aka Jerusalem artichokes) but they are really tasty- almost starchy like a potato. Don't be afraid of their appearance, the sunchokes really do taste wonderful.

Herb Roasted Squash and Sunchokes
Gluten Free
Makes 4 servings


one lb butternut squash  peeled and cut into bite sized chunk (about two cups)
one lb small sunchokes, unpeeled cut in quarters
one medium red onion; cut into wedges
one tbsp olive oil
one tbsp fresh rosemary, minced
one tbsp fresh thyme, minced
salt and pepper

Preheat oven to 400degrees. Line a large baking sheet with foil amd spritz with non stick spray.

Place vegetables on pan. Drizzle oil over vegetables and sprinkle herbs on top. Season with salt and pepper to taste and stir vegetables until evenly coated with oil and herbs. (you can use a spoon to do this but your hands work best!)

Roast about an hour or until vegetables are tender and golden. (Stir every twenty minutes)

Nutrition Information--approximately 164 calories per serving, 3g protein, 5g fat, 13g sugar, 8 mg sodium


Thursday, September 15, 2011

A True Miracle

This dish is embarrassingly easy (there's pretty much three ingredients) but it's one of my all time favorites so I had to post it. It utilizes Miracle Noodles which are the gluten free chef's best friend. The noodles are easy to prepare(can you say microwave??), tasty, and gluten-free. Did I mention they have zero calories?? You can find the noodles on Amazon or in health food stores (There are also shirataki  noodles that are similar in nature but I prefer the flavor of Miracle Noodles). It's worth finding them to create this cheesy and creamy creation!

Creamy Squash Noodles
Gluten Free
Makes 1 Serving


1 cup cubed butternut squash
1 Laughing Cow light Swiss cheese wedge
1 package Miracle Noodles
Salt
Pepper
Cayenne
1/2 tsp grated Parmesan cheese

1. Preheat oven to 400 degrees. Place squash on a baking sheet lined with aluminum foil. Spray with nonstick stick olive oil and season with salt, pepper, and cayenne.

2. Roast squash for about 25 minutes (or until tender), stirring halfway through.

3. Drain and rinse noodles in a strainer than pat dry with a paper towel. Place noodles in a small microwave safe bowl and use kitchen shears to cut noodles into smaller pieces. Season with salt and pepper and then microwave noodles for one minute. Remove bowl from microwave and set aside.

4. Place cheese wedge in a small dish and microwave for 15 seconds than break into small pieces

5. Add cheese and squash to noodles and stir. Microwave for 45 seconds. Stir until noodles get coated in cheese and squash is evenly distributed.

 6. Sprinkle with Parmesan cheese

 Nutrition information-- approximately 105 calories

The Ideal Lunch

This sandwich may sound pretty strange but I promise it's spectacular. I was inspired by a recipe from Bethanny Frankel and I spent a long time altering it until I finally found the right mix of ingredients. Now  that I have it perfected, I eat it as often as possible. Not to mention, it's super simple so there is really no excuse not to make it. Try this sandwich as soon as possible!

The Ultimate Tofu Sandwich

three oz firm tofu (check for gluten; I prefer the kind by Mori-Nu)
one tsp dijon mustard 
one tsp grated parmesan cheese
1/2 tsp Spike Seasoning (or salt and pepper)
sprinkle of cayenne (depending on your preferred level of heat)
two tbsp textured vegetable protein (such as Bob's Red Mill, many grocery stores have it near the rice or you can find it on amazon)
zero calorie butter spray
two slices light gluten free bread (like the kind by ener-g)

1. Use paper towels to dry the tofu as thoroughly as possible then place in a small bowl. Use a fork to crumble tofu into tiny pieces.

2. Add mustard, parmesan, Spike, cayenne, and textured vegetable protein to tofu. Stir until thoroughly combined (using the back side of the spoon helps)

3. Toast bread and then spritz with butter spray.

4. Scoop tofu mixture onto bread. ( I divide it evenly between the two slices and eat as an open faced sandwich) Enjoy!

Tuesday, September 13, 2011

Breakfast, Lunch, Or Dinner

Need a meal that can be served any time of the day? Mini Mixed-Up Quiche is the answer! This tasty quiche, composed of a cinnamon crust and stuffed with a mushroom, bacon, egg filling, can't decide what type of meal it wants to be. Don't worry you don't have to decide either- it would taste great morning, noon, or night.The original recipe from Hungry Girl was for a full sized quiche but since there's only one of me, I altered it to be an individual serving (with the help of mini pie plates). The crust also needed to be transformed into gluten-free-ness so I brought in the ever useful Chex cereal.  The resulting quiche is super-adorable and scrumptious.

Mini Mixed-Up Quiche
Gluten-Free
Makes 2 Mini Quiches (1 serving)


Crust:
1 cup corn Chex
2 tbsp. liquid egg substitute
1 Truvia packer
1/2 tsp. cinnamon

Filling:
3 oz. frozen chopped spinach, thawed and drained
1/2 slice turkey bacon, cooked and chopped into small pieces (my favorite is the natural kind by Applegate Farms)
1/3 cup liquid egg substitute
3 white mushrooms, sliced
1/8 tsp. baking powder
Sprinkle of salt
1 tbsp. reduced fat cheddar cheese, shredded
1 tbsp. Silk Unsweetened Almond Milk
1 tbsp. fat free feta cheese

1. Preheat oven to 350 degrees. Spray two mini pie plates with non-stick spray (if you don't have mini pie plates, you could use small oven-proof ramekins)

2. Place Chex in small food processor or blender. Grind until a bread-crumb like consistency is reached and then transfer to a small bowl.

3. Stir in egg substitute, Truvia, and cinnamon. Scoop mixture into pie plates and use the back of a spoon to mold crust onto the bottom and sides of pie plates

4.  Bake crust for 8 minutes and remove from oven (but leave oven on).

5. In a small bowl, combine all of the filling ingredients except for the feta cheese.

6. Divide filling evenly between pie dishes and sprinkle both with feta cheese.

7. Bake until filling is set, approximately 20 minutes.


Sunday, September 11, 2011

Mistakes Can Create Something Great

My breakfast today was inspired by a Hungry Girl recipe for blueberry scones that I made before giving up gluten. I changed the recipe quite a bit, however and the result was decidedly un-sconelike.Therefore, I've decided to call it the Anti-Scone- an extremely moist creation that conjures up images of Apple Pie with it's delicious cinnamon, apple, and oatmeal flavor combinations. While it may not be an authentic scone, this recipe is super simple and delectable!

The Apple Pie Anti-Scone
Gluten-Free
Makes 4 servings


1/3 cup regular gluten-free oats (such as Bob's Red Mill)
1/3 cup cinnamon Chex (the BEST gluten-free cereal!)
1/3 cup gluten-free pancake mix (such as Pamela's)

2 tsp. brown sugar
2 tsp. Truvia
1 tsp cinnamon
Sprinkle ground ginger and nutmeg
1/2 tsp baking powder

Zero Calorie Butter Spray
2 tbsp. sugar-free maple syrup
1 tsp. vanilla
1/3 cup Almond Breeze unsweetened vanilla almond milk
1/2 apple, diced into small chunks (about 3/4 cup)

1. Preheat oven to 400 degrees. Spray a baking sheet with nonstick spray.

2. Place cinnamon Chex in a ziploc bag and seal tightly. Use your hands to crush Chex until they are about the same size as the oatmeal. (Alternatively, you could use a small blender but who wants to have to clean the blender?)

3. Combine dry ingredients in a large bowl (oats, chex, pancake mix, brown sugar, truvia, spices, and baking powder).

4. Spritz dry ingredients with butter spray until they begin to stick together. Stir in milk and mix well. Fold in apple chunks.

5. Spoon batter into 4 even mounds on baking sheet (be sure to spread them out so they don't run together). Don't worry if they look a little messy, they will still be delicious!

6. Bake 10-11 minutes or until edges begin to brown.

Nutrition Information-- approximately 115 calories per scone


Wednesday, September 7, 2011

Gluten Fake-Out

It's been about a year since I had to give up gluten and lately I've really been missing bread! Thankfully, I have realized that making gluten-free bread is quite possible and often quite easy. This HG-modified recipe will satisfy anyone's bread cravings and you won't even miss the evil gluten. For a superb breakfast, try topping a slice with cinnamon-sugar, whipped cream, and maple syrup. Delizioso!

Pumpkin-Apricot Bread
Gluten Free
Makes 1 loaf


1.5 cups gluten free all purpose flour
1/2 cup Truvia sweetener
1/4 cup brown sugar (not packed)
2.25 tsp baking powder
3 tsp cinnamon
1/2 tsp nutmeg
1/4 tsp cloves
1/4 tsp ginger
1/4 tsp salt
1 (15 oz) can pure pumpkin
1/2 cup liquid egg substitute
1 teaspoon pure vanilla extract
1/4 cup dried unsweetened apricots, chopped

1. Preheat oven to 350 degrees.

 2. In a large bowl combine flour, Truvia, brown sugar, baking powder, spices (cinnamon, nutmeg, cloves, ginger) and salt.

 3. In a medium bowl, mix pumpkin, egg, and vanilla (wet ingredients).

4. Add wet ingredients to flour mixture and stir until just blended. Sprinkle in apricots (be sure they don't all stick together).

5. Pour batter into a loaf pan sprayed with nonstick spray. Bake for about 48 minutes or until top is firm to touch. Allow to cool completely before slicing.

 Nutrition information-- approximately 143 calories per serving (1/8 of loaf)

Tuesday, September 6, 2011

Potato Makeover

It all started when I saw a Hungry Girl recipe for twice-baked potatoes (a childhood favorite!). It looked delicious but I didn't have some of the ingredients which prompted me to make a few substitutions, Eventually, the multiple substitutions led me down the path to the mammoth creation you see below. The Four Cheese Supreme Potato Tower is a yummy potato creation stuffed with ricotta, feta, cheddar, and mozzarella which is then topped with tangy yogurt and herbs.

Four Cheese Supreme Potato Tower
Gluten-Free


1 (8 oz) Yukon Gold potato
1 slice fat free cheddar cheese
1 oz fat free feta cheese
1 tbsp fat free ricotta cheese
1 tbsp Silk unsweetened almond milk
1/2 tsp chives
1 tbsp mozzarella cheese, shredded
Salt and pepper

Optional toppings--
Fat free Greek yogurt
Fresh parsley
Green onions

1. Preheat oven to 375. Prick potato a few times with a fork and place on a microwave safe plate. Microwave 6-8 minutes or until tender.

2. Meanwhile, combine feta, ricotta, cheese slice, milk, and chives in a small bowl.

3. Once potato is cool enough to handle, cut a hole in the top of potato and scoop out the flesh to form a "potato bowl".


4.Add potato flesh to cheese mixture. Stir until well combined and season  with salt and pepper.


5. Carefully scoop cheese/potato mixture into potato bowl. Bowl will be overflowing, don't be afraid to pack it in!


6. Carefully transfer potato to baking sheet sprayed with nonstick spray. Bake 20 minutes or until lightly golden. Sprinkle cheddar on top and bake about two minutes more (until cheese is melted).


7. Top potato with a dollop of yogurt, green onions, parsley or whatever toppings you choose.

Monday, September 5, 2011

Microwave Magic

What happens if you're stranded on a desert island with only a microwave? Do you have to resort to Chef Boyardee for dinner? Nope, you can still have a spicy, cheesy, scrumptious dinner! Don't worry I was skeptical as well when I saw this recipe in an Eating Well cookbook but the microwave actually works brilliantly.

Refried Bean Poblanos with Cheese
Gluten-Free
Serves 4


4 medium poblano chiles, halved and seeded
1 (16 oz) can fat-free refried beans
1 (8.8 oz) pouch microwaveable cooked long-grain rice (I used Uncle Ben's)
1/2 cup picante sauce (I used salsa instead)
1 cup reduced fat Mexican cheese blend, shredded

1. Place chile halves, cut side up, on a microwave safe plate. Cover with wax paper and microwave 3 minutes.

2. Meanwhile, combine beans, rice, and picante sauce in a medium bowl.

3. Spoon bean mixture evenly into chile halves. Cover with wax paper and microwave 2 minutes.

4. Sprinkle each chile half with 2 tbsp of cheese. Microwave uncovered until cheese melts (about 1 minute).

Nutrition Information--Approximately 303 calories per serving (2 chile halves), 17g protein, 45.4g carb, 6g fat


Sunday, September 4, 2011

Leaning Tower of Pancakes

Mini Banana Pancakes are once again a Hungry Girl recipe that was converted to gluten-free. The pancakes turned out to be absolutely delicious. Not to mention, if you're like me and don't  like to do a lot of prep in the morning, you can do most of the work ahead of time. I simply prepared steps 1 and 2 the night before and stored them in the fridge separately. The next morning I just stirred the two bowls of ingredients together and poured into the pan! Of course, you could make the pancakes completely ahead of time and reheat them but there is something special about pancakes hot off the griddle!

Mini Banana Pancakes
Gluten free
Makes 1 serving


1/4 cup gluten free all purpose flour (such as Bob's Red Mill Gluten Free All Purpose Flour)
1/4 cup mashed ripe banana (about half a bananas worth)
3 tbsp. liquid egg substitute
1 tbsp. Almond Breeze unsweetened vanilla almond milk (or you could substitute skim milk)
1/4 tsp baking powder
1/8 tsp vanilla extract
1 packet Truvia
1 tsp cinnamon
Dash salt
Pancake toppings

1. In a small bowl combine all dry ingredients  flour, baking powder, Truvia, salt, and cinnamon) until combined.

2. In a separate small bowl, combine banana and wet ingredients (egg substitute, milk, and vanilla) until mixed well.

3. Combine wet and dry ingredients and stir thoroughly.

4. Bring a large pan sprayed with nonstick spray o medium heat. Drop batter by the tablespoon into pan( you will have 8 pancakes total, you may need to do two batches). Once pancakes begin to look solid and bubble after about 2 minutes, gently flip. Cook for an additional minute until both sides are lightly browned. 

5. Plate pancakes and top with desired toppings (syrup, whipped cream, fresh bananas, etc)

 Nutrition information-- aprtoximayely 185 calories, 1g fat, 9.5g protein, 37g carbs

Saturday, September 3, 2011

Gourmet Grilled Cheese

When your in the mood for a childhood favorite with a grown-up twist, this is the sandwich for you. Like the classic grilled cheese, this has cheese oozing from every angle yet the addition of red peppers and eggplant makes it more substantial and tastier. Plus, the soft, spreadable Laughing Cow cheese eliminates the need for all the butter. The resulting sandwich is healthier and more appealing than the original.

Mediterranean Grilled Cheese
Gluten Free* Vegetarian
Serves 1


2 slices gluten free light sandwich bread
1 wedge Laughing Cow Light Mozzarella, Sun-Dried Tomato & Basil, room temperature
1 slice fat-free cheddar cheese
1 piece roasted red pepper, cut into thin strips
1 thin round of eggplant, skin removed
Salt and pepper

1. Preheat grill pan to medium heat.

2. Spray eggplant with olive oil spray and season with salt and pepper on one side. Place seasoned side down on grill and season other side (olive spray, salt and pepper)

3. Grill about 3 minutes per side or until grill marks appear and eggplant is tender. Remove from grill

4. Spread half of Laughing Cow cheese wedge on each slice of bread. Place cheese slice on top of Laughing Cow on one slice of bread. Lay red pepper strips on top of cheese in a single layer. Finish with grilled eggplant and top with remaining bread slice. Be sure to place cheese side facing inwards.

5. Spray outside of sandwich with olive oil spray and place on grill. Grill until golden brown and cheese melts (about 3 minutes per side).

Nutrition Information--approximately 225 calories

Friday, September 2, 2011

Cheesy Paradise

Dinner for tonight was a gluten free version of manicotti. Traditionally, manicotti is made using gluten-y noodles but who needs noodles when you have eggplant? The noodles aren't missed at all as each bite is a heavenly harmony between three cheeses, marinara sauce, fresh basil, and roasted eggplant. I found this recipe in a cookbook by Rocco Dispirito that transforms fattening dishes into healthy ones. This manicotti certainly  fits the theme and is positively healthy considering the ingredients.

Eggplant Manicotti
Gluten Free * Vegetarian
Serves 4


1 large eggplant ( about 8 inches long and 5 inches wide)
Salt and pepper
1 cup fat free ricotta
1/2 cup parmigiano-reggiano cheese (expensive but completely worth the money)
1/2 cup fresh basil, chopped
1.5 cups marinara sauce (check for gluten; I use Classico Tomato and Basil)
1 cup shredded reduced fat mozzarella cheese

1. Preheat oven to 450 degrees. Line 2 baking sheets with parchment paper.

2. Use a large knife (a santoku works best if you have one) to square off the eggplant and make it easy for slicing. Next, slice the eggplant lengthwise into 8 slices that are about 1/6-inch wide. Lay the eggplant slices on the prepared baking sheets and coat with nonstick spray. Season with salt and pepper.

3. Roast the eggplant for about 20 minutes or until almost tender. Remove eggplant, but leave oven on.

4. While the eggplant is cooling, combine the ricotta, 1/4 cup of the Parmigiano-Reggiano, and the basil in a medium bowl. Season with salt and pepper.

5. Spread 3/4 cup of the marinara sauce over the bottom of a 7x10 baking dish (I just used a 9x13 pan and didn't spread the sauce all the way to the edges).

6. Lay the roasted eggplant slices on a cutting board. Spoon 1/8 of the ricotta mixture onto the bottom of each eggplant. Roll up jelly roll style to wrap the filling. Nestle the manicotti seam side down in the baking dish. Pour the remaining 3/4 cup of marinara sauce on top and sprinkle with the mozzarella cheese and remaining 1/4 cup parmigano-reggiano.

7. Bake about 18 minutes or until cheese is bubbly and the filling is hot.

Nutrition Information-- Approximately 238 calories per serving (2 rolls), 8.3g fat, 21g protein, 19g carbohydrates


Thursday, September 1, 2011

Easy Entertaining

This hummus is perfect for serving at dinner parties although it's so amazing you might want to save it for yourself! Actually, I did eat the whole bowl for dinner :) As usual, this recipe is from Hungry Girl (I guess I need to expand my recipe collection huh?) The great thing about this recipe is that it tastes even better when made ahead of time. You can serve it with gluten free bread/ pita or a variety of vegetables (carrots, cauliflower,etc) Enjoy!

High and Mighty Hummus
Gluten free * Vegetarian
Makes 1 cup


1 7 oz. can chickpeas, drained and rinsed
1 cup canned artichoke hearts, drained
1/8 cup vegetable broth
1/8 cup plain fat-free Greek yogurt
2 tsp. lemon juice
3/4 tsp. crushed garlic
1/4 tsp. salt
1/4 tsp. pepper
3/4 tsp cumin
1/4 tsp paprika
3 sprigs fresh parsley

1. Place all ingredients in a food processor ( I just used a small one). Pulse until desired consistency is reached (I like mine a little chunky).

2.  Refrigerate for a few hours for best results.

Nutrition Information-- Approximately 56 calories (per 1/4 cup)