Pages

Foodie Blogroll

Wednesday, October 31, 2012

Irish Nachos

I had never heard of Irish Nachos until about a week ago when the daily Hungry Girl email featured a recipe for them. Traditionally, potatoes are used in Irish Nachos but Hungry Girl's version utilized the often overlooked turnip instead. In the dish, turnip slices are roasted until crisp then piled with typical nacho toppings like salsa and melted cheese. I was very intrigued by the recipe and knew I needed to make my own variation as soon as possible. The ending result  was wonderfully gooey, cheesy, and spicy. I'm not sure if they really reminds me of nachos but Irish Nachos are still a success in my book.

Irish Nachos
Gluten Free
Serves One

Ingredients:
2 roma tomatoes, cut into quarters
1 poblano pepper, cut into a large dice
1 medium turnip (about 12 oz), cut into thin half moon slices
1/4 tsp. garlic powder
1/4 tsp. chili powder
Dash black pepper
2 slices fat-free white cheddar cheese
1/4 cup salsa
salt and pepper
Optional Toppings- hot sauce, additional salsa

1. Preheat oven to 400 degrees. Place tomatoes and peppers on a baking sheet lined with aluminum foil. Spray vegetables thoroughly with olive oil spray and season with salt and pepper.

2. Roast vegetables 25-30 minutes, or until tomatoes begin to split and peppers begin to blister. Stir vegetables halfway through cooking.

3. Set aside roasted vegetables and raise oven temperature to 450 degrees. Respray baking sheet with nonstick spray.

4. Lay turnip slices on the baking sheet, and sprinkle with salt. Bake for 12 minutes.

5. Flip slices, and bake until tender on the inside and slightly crispy on the outside, about 12 more minutes.

6. Remove turnip slices from oven but leave oven on.

7. Spray a oven safe plate or dish with nonstick spray and closely arrange turnip slices on the plate. Sprinkle with garlic powder and chili powder. Tear cheese slices into pieces and place on top of turnips. Evenly distribute roasted tomatoes, pepper, and salsa on top of cheese

8. Transfer plate to oven and bake until cheese has melted, 1 - 2 minutes.

9. Top nachos with any desired optional toppings.

Nutrition Information--approximately 205 calories per serving (entire recipe)


Monday, October 29, 2012

Provencal Tilapia

Provencal Tilapia is a maginificent dish that was adapted from a recipe by Rachael Ray.  In this amazing entree, delicate tilapia filets are coated in an olive paste, topped with herbs and fresh tomatoes, then oven roasted on a bed of fresh vegetables. This recipe requires little prep or clean-up since everything is roasted in the same pan yet it still manages to taste quite complex and elegant.

Provencal Tilapia
Gluten Free
Serves Four

Ingredients--
2 cups broccoli, broken into florets
2 tsp. extra virgin olive, divided
1 pound fresh green beans
2 cloves garlic, sliced
1 tsp dried parsley, divided
salt and pepper
1 cup pitted nicoise or kalamata olives
1 lb. tilapia filets, fresh or frozen (thawed according to package directions)
2 large tomatoes, thinly sliced
1 tsp. dried thyme
1/2 tsp. dried marjoram

1. Position a rack in the center of the oven and preheat to 450 degrees . Line a large rimmed baking sheet  with aluminum foil and spray with nonstick spray.

2. Add broccoli to the pan. Drizzle with 1 tsp. olive oil and season with salt and pepper. Transfer to oven and roast 10 minutes.

3. Meanwhile, use a food processor or immersion blender to pulse the olives into a thick paste. Set aside.

4. Once broccoli is removed from oven, stir in green beans, garlic, and 1/2 tsp of the parsley. Season with salt and pepper than drizzle with remaining 1 tsp. of olive oil. Stir until vegetables are coated in oil and spices (or use your hands to mix), then spread vegetables into an even layer on the baking sheet.

5. Season the fish with salt and pepper, then slather with the olive paste. Carefully set on top of the vegetables.

6. Top each piece of cod  with a shingled layer of the tomatoes. Sprinkle with thyme, marjoram, and remaining 1/2 tsp of parsley.

7. Transfer pan to oven and roast until  fish is cooked through and flakes easily, about 18 minutes.

Nutrition Information--approximately 225 calories per serving (1/4 of the recipe- 1 piece of fish and 1/4 of the vegetables)

Before Roasting...

After Roasting

Wednesday, October 24, 2012

Asian Tofu Lettuce Wraps

Asian Tofu Lettuce Wraps may look like a simple and ordinary recipe, however, while the wraps are indeed simple to make, their flavor is phenomenal. First, crumbled tofu is sauteed with garlic and ginger until golden and tasty. Next, a few spices and vegetables are thrown into the pan and sauteed until all the flavors meld.After that, simply scoop the tofu filling into the lettuce cups, wrap, and devour. The end product is a delectable gluten free meal that's hand held, fun to eat, and different from the norm.

Asian Tofu Lettuce Wraps
Gluten Free
Serves One

Ingredients--
7-8 Paddy Straw dried mushrooms (or any kind of dried mushrooms)
1/2 tsp. extra virgin olive oil
1 small garlic clove, minced
1 tsp. fresh ginger root, grated
3 oz. extra firm light tofu (like the kind by Mori-Nu), check for gluten
1/4 cup frozen peas, defrosted
1/8 tsp. chili powder
1/8 tsp. paprika
1 tbsp. gluten free soy sauce
1/2 teaspoon Balsamic Vinegar
4-6 butter lettuce wraps (or whatever kind of lettuce you prefer for wrapping)
Salt and Pepper

1. Place mushrooms in small bowl and cover with boiling water. Let sit until soft, 8-10 minutes. Remove mushrooms from water, dry thoroughly, and chop into bite sized pieces. Set aside.

2. Heat oil in a small nonstick skillet over medium-low heat. Add ginger and garlic to skillet and saute for 1 minute.

3. Wrap tofu in a paper towel and dry thoroughly before adding to skillet. Use a spatula to crumble tofu into very small pieces. Cook tofu for 5-6 minutes, until most of the liquid evaporates and tofu starts to turn golden.

4. Add the mushrooms, chili powder, paprika and soy sauce to the pan, then cook until most of the liquid has been absorbed.

5. Stir in the peas and continue cooking, just until peas are heated through.

6. Remove the pan from the heat and stir in balsamic vinegar. Test for seasoning, then add salt and pepper, to taste.

7. Plate the lettuce cups and divide tofu mixture between lettuce. Fold up and enjoy!

Nutrition Information--approximately 110 calories per serving


Tuesday, October 23, 2012

Roasted Buffalo Shrimp

I stumbled upon the recipe for Roasted Buffalo Shrimp when I was searching for a fast and delicious way to use up frozen shrimp. After a few small changes, this dish from MarthaStewart.com fit the bill perfectly. The shrimp are tossed in a sophisticated version of a  "buffalo" sauce and then quickly roasted in the oven. The end result is a flavorful and unique shrimp dish that make a great light entree or easy appetizer.

Roasted Buffalo Shrimp
Gluten Free
Serves Four

Ingredients--
1.5 tbsp. lemon zest, finely grated
1.5 tbsp fresh squeezed lemon juice
1 garlic cloves, minced
1.5 teaspoons sweet paprika
1/8 teaspoon cayenne pepper, or more to taste
1 tsp. coarse salt
1 tbsp + 1 tsp. honey
2 tbsp extra-virgin olive oil
1 pound medium to large shrimp, peeled and deveined (You can leave the tails-on depending on how you are serving the shrimp)


1. Preheat oven to 450 degrees. Line a large baking sheet with parchment (or foil sprayed with nonstick spray) and place in the oven to heat.

2.  Stir together lemon zest, garlic, celery seeds, paprika, cayenne, salt, the honey, and oil in a large bowl. Add shrimp, and toss to coat well.

3. Place shrimp in a single layer on hot baking sheet. Roast, without flipping, until browned on bottoms and opaque throughout, about 5 minutes.

Nutrition Information--approximately 200 calories per serving (1/4 of the recipe)

Thursday, October 18, 2012

Roasted Eggplant Curry


Roasted Eggplant Curry, adapted from HealthfulPursuit.com, is  a terrific way to enjoy Indian food without having to go out to a restaurant. I'm sure it isn't 100% authentic when compared to traditional Indian curries, however, it does incorporate many Indian spices and ingredients. Plus, it tastes phenomenal so really what else matters? In this recipe, roasted eggplant is slowly simmered with tomatoes and spices to create an enticing and exotic tasting curry. This dish tastes great on it own, or you can serve it over roasted vegetables or rice. It does require a few unique spices but you should be able to locate all of them at any major supermarket and they can used in countless Indian dishes.

Roasted Eggplant Curry
Gluten Free
Serves Four

Ingredients--
2 medium-sized eggplants
1 tbsp. extra virgin olive oil, divided
2.5 tsp. cumin seeds
2 garlic cloves, minced
2 tbsp ginger root, grated
1 can (14.5 oz) diced tomatoes, not drained
1 tsp ground coriander
1 tsp turmeric
1 tbsp garam masala
Salt
1/4 cup fresh parsley, chopped, divided


1. Preheat oven to 425 degrees. Line a baking sheet with aluminum foil and spritz with nonstick spray.

2. Slice the eggplant in half lengthwise and drizzle 1/2 tsp. of olive oil on the flesh side of each eggplant half. Season with salt. Place eggplant flesh side down on baking sheet and roast for 25-30 minutes or  until the flesh is tender and the outside is a nice dark charred color.

3. Meanwhile, heat the remaining 2 tsp. of olive in a large saucepan over medium  heat. Add the cumin seeds and cook for 1-2 minutes or until fragrant and toasted, stirring constantly (watch seeds carefully, they will burn quickly!).

4. Add the ginger and garlic to the pan and saute for 1-2 minutes more or until fragrant.

5. Stir  in the tomatoes, coriander, turmeric, garam masala and 1/4 tsp of salt. Turn the heat to  medium low and allow mixture to cook about 8 to 10 minutes more, stirring often.

6. When the eggplant is done roasting, set it aside until cool enough to handle. Once eggplant is slightly cooled, peel off and discard the charred skin, then scoop the flesh into a bowl. Use a potato masher to roughly mash eggplant (don't worry if it's not perfect, since the curry will be pureed at the end), and add it to the stove top mixture. Cook for another 3-5 minutes, or until  heated through.

7. Sprinkle curry with 2 tbsp. of the fresh parsley, then use to an immersion blender to blend mixture until pureed but still chunky. (Alternatively, transfer mixture to a food processor and puree).

8. Divide curry into serving dishes and garnish with remaining parsley.

Nutrition Information--approximately 120 calories per serving (1/4 of the recipe)

Tuesday, October 16, 2012

Cannellini Bean Bolognese


Cannellini Bean Bolognese is a quick yet filling vegetarian sauce that makes the perfect topping for gluten free noodles, polenta, or anything else you need a topping for. This tasty sauce requires very little effort or time yet tastes as if it has been simmering all day. Plus, it's a great way to use up any leftover beans you might have in your fridge.


Cannellini Bean Bolognese
Gluten Free
Serves One

Ingredients--
1 garlic clove, minced
1/4 cup canned cannellini beans, drained and rinsed
3/4 cup crushed tomatoes
1/4 tsp. dried oregano
1/2 tsp. balsamic vineger
1 tsp. grated parmesan cheese
a few leaves fresh basil, chopped
salt & pepper

1. Spray a medium saucepan with nonstick spray and heat over medium-high heat.

2. Add the garlic, and cook until fragrant, about 30 seconds.

4.Stir in the beans, tomatoes, oregano, and 1/8 tsp salt. Bring sauce to a summer, then reduce heat to medium low, cover and cook until the sauce has reduced and thickened slightly, about 15 minutes. Stir sauce occasionally.

5. Stir in the vinegar and turn off the heat. Season to taste, with salt and pepper.

6. Garnish sauce with parmesan and fresh basil prior to serving.

Nutrition Information--approximately 130 calories per serving (entire recipe)


* This recipe was based on the Herbed Tofu Marinara I posted a few months ago. If you like this recipe, then you definitely need to try the tofu variation.
http://spicysweetpotato.blogspot.com/2012/03/herbed-tofu-marinara.html


Roasted Portobello Tacos

Roasted Portobello Tacos is a variation of a recipe I found on KeepInItKind.com. In this elegant twist on tacos, a scrumptious vegetable saute replaces the typical salsa as the hearty portobello mushroom stands in for the meat. The addition of mediterranean flavors such as balsamic vinegar, olives, and sundried tomatoes takes these exceptional yet easy tacos to the next level.


Roasted Portobello Tacos
Gluten Free
Serves One

Ingredients:
1 large portobello mushroom,
2 tsp gluten free soy sauce
1 tsp balsamic vinegar
1/4 tsp liquid smoke*
1/4 tsp dried thyme
1/4 tsp dried marjoram
1 small garlic clove, minced
1/4 cup frozen peas, thawed and patted dry
2 kalamata olives, pitted and finely chopped
2 sundried tomatoes halves, reconsituted and chopped
1/4 of a green bell pepper, thinly sliced
1/4 tsp herbes de Provence
2 tbsp. fresh parsley, finely chopped
salt and pepper to taste
2 (6-inch) corn tortillas, check for gluten
Optional--fresh spinach, baby kale, or arugula for topping

1. Preheat oven to 400 and line a small baking sheet with parchment paper (or aluminum foil sprayed with nonstick spray).  Remove the stem from the mushroom and finely chop. Set aside.

2. In a small bowl, whisk together the soy sauce, balsamic vinegar, liquid smoke, thyme and marjoram.  Place mushroom cap in bowl and turn to coat on all sides. Let marinate for 5-10 minutes (This a good time to prep the rest of the ingredients).

3. Remove mushroom from marinade and place stem side up on prepared baking sheet. Drizzle a few spoonfuls of marinade over mushrooms and reserve remaining marinade

4. Bake in the oven for 10-15 minutes (depending on how firm you want them).  Remove and let cool until they are cool enough to handle.

5. While the mushrooms are in the oven, you can begin cooking the vegetables. Spray a medium skillet with nonstick spray and heat to medium low.

6.   Add the garlic to the pan and sauté for one  minute, or until fragrant.  Add the reserved mushroom stems, peas, olives, sundried tomatoes, bell pepper, and  herbes de provence , Saute until bell peppers start to get a little soft, about 5-7 minutes. Season with salt and pepper to taste. Stir in parsley and remove pan from heat.

7. Once the mushrooms are cool enough to handle, slice them, on a diagonal, into wide strips.

8.  Wrap the corn tortillas up in the damp paper towel and microwave until warm and pliable, 15-30 seconds.

9. Place tortillas flat on serving plate and divide the sauteed vegetable mixture amongst the  tortillas. Top each tortillas with half of the mushroom slices. Serve immediately and Enjoy!

Nutrition Information--approximately 205 calories per serving (entire recipe)

*You can find liquid smoke in the BBQ sauce section of any major super market.


Monday, October 15, 2012

Pumpkin Spice Cornbread

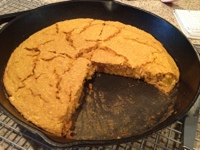
Pumpkin Spice Cornbread, adapted from the Daily Garnish, is the perfect bread for serving alongside hearty stews and soups. It has all the traditional cornbread flavors but the addition of pumpkin, maple syrup, and a few extra spices adds a hint of sweetness to this delectable bread. The cornbread is baked in a cast iron skillet which yields the perfect crusty exterior and fluffy interior. Plus, using the cast iron skillet just makes the cornbread seem more authentic!

Pumpkin Spice Cornbread
Gluten Free
Serves 12

Ingredients--
1 cup gluten free cornmeal
1 cup gluten free flour mix (or gluten free all purpose flout
1 cup frozen corn, thawed and thoroughly dried
1 tablespoon baking powder
1 teaspoon sea salt
1/2 teaspoon cinnamon
1/4 teaspoon nutmeg
1/8 teaspoon ginger
dash of cayenne, if desired
1 cup + 2 tablespoons pumpkin puree
3 tablespoons unsweetened applesauce
2 teaspoons grapeseed oil (or canola oil)
1/3 cup unsweetened orginal almond milk
1/4 cup sugar free pancake syrup
1/2 cup liquid egg substitute


1. Preheat the oven to 400 degrees. Spray a 12-inch cast iron skillet with nonstick spray. (If you don't have a cast iron skillet, a square baking dish will work).

2. In a large bowl, stir together cornmeal, flour, thawed corm, baking powder, salt, and spices (cinnamon, nutmeg, ginger, and cayenne) until combined.

3. In a medium mixing bowl, stir together pumpkin, applesauce, oil, milk, syrup and eggs until combined.

4. Pour pumpkin mixture into cornmeal mixture and stir until just combined.

5. Add cornbread batter to the cast iron skillet and spread out evenly.

6. Bake at 400 degrees for 26-30 minutes or until slightly golden on top and firm to the touch. (Mine was done after 27 minutes.)

7. Allow bread to cool for a few minutes prior to slicing and serving.

Nutrition Information--approximately 115 calories per serving (1/12 of the recipe)


Thursday, October 11, 2012

Black Bean Nacho Burger

Black Bean Nacho Burgers is an ingenious recipe from Food Nework's Melissa D'Arabian that takes all the flavors of a nachos platter and turns them into a delicious vegetarian burger. In this dish, an ordinary black bean patty  is taken to the next level with salsa, cheese, spices, and more. The end result is a slightly messy, spicy, and amazing burger.

Black Bean Nacho Burger
Gluten Free
Makes One Burger

Ingredients--
1/4 cup black beans, drained and rinsed
2 tbsp. Corn Chex, crushed
1 tbsp fresh salsa
1 slice fat free Cheddar Cheese, torn in pieces
2  tsp. liquid egg substitute
2 tsp. scallions, finely chopped
1/8 tsp. chili powder
dash of cayenne, if desired
1/8 tsp. black pepper
2 slices light gluten free sandwich bread*
Optional Toppings: butter lettuce(or any type of greens), hot sauce, salsa

1. Use a  potato masher to smash beans until chunky, leaving some partly whole. Stir in crushed Chex, salsa, cheddar cheese pieces, egg, scallion and black pepper. Mix until ingredients are well combined.

2. Shape mixture into a patty and place on a plate. Cover plate with plastic wrap and refrigerate at least 30 minutes or overnight.

3. Spray a small skillet with nonstick spray and heat to medium. Add patty to pan and cook until golden brown on one side, 4 to 5 minutes.  Flip patty and cook until underside is golden, 4 to 5 minutes.

4. Once burger is almost finished cooking, begin toasting sandwich bread.

5. After burger is golden on both sides, remove  from pan and and place on toasted bread. Top with lettuce , hot sauce, and/or salsa, if desired.

Nutrition Information--approximately 220 calories per burger

* Feel free to use any type of gluten free bread, or wrap that you like. Sandwich bread is something that I like, and always have on hand so it's my go-to bread option.


Wednesday, October 10, 2012

Peach and Blueberry Cobbler


Peach and Blueberry Cobbler may seem like a strange dessert to have in October but it still tastes quite fantastic no matter what time of year it is. I was planning on serving a totally different dessert, however, my grocery store was out of what and I needed and peaches just happened to be on sale so I went with it! This recipe was inspired by a dish in Rocco DiSpiritio's Now Eat This Cookbook. Using a baking mix (the original recipe uses Bisquick) is the perfect way to make this gooey and delicious cobbler a no fuss treat. Everyone will think you've spent hours slaving in the kitchen to make this amazing fruit dessert when really it only takes a few minutes!

Peach and Blueberry Cobbler
Gluten Free
Serves 6

Ingredients--
4 ripe peaches, peeled, pitted, and sliced
1 cup fresh blueberries
1/2 cup Truvia sweetener, divided
3/4 cup plus 1 tablespoon gluten free pancake mix*
1/2 teaspoon ground ginger, divided
1/2 teaspoon ground cinnamon, divided
1/4 teaspoon nutmeg
1/3 cup unsweetened vanilla almond milk, like the kind the by Silk

1.Preheat the oven to 425°F. Spray a 9x13-inch glass baking dish with cooking spray, and set it aside.

2. In a medium bowl, mix together the peaches, blueberries, 1/4 cup of the Truvia, 1 tablespoon of the pancake mix, 1/4 teaspoon of the ginger, and 1/4 tsp. of the cinnamon. Pour the fruit mixture into the prepared baking dish.

3. In a medium bowl, combine 2 tablespoons of the Truvia, the remaining 3/4 cup of pancake mix,  remaining 1/2 tsp ginger, remaining 1/2 tsp. cinnamon, nutmeg and almond milk. Stir until the mixture forms a soft dough. Drop spoonfuls of the dough evenly over the fruit mixture. Sprinkle the remaining 2 tablespoons of Truvia over the dough.

4. Bake the cobbler until the fruit is tender and the topping is golden brown, about 22-25 minutes. Let it rest for 5 minutes before serving.

Nutrition Information--approximately 125 calories per serving (1/6 of the recipe)

* I used  Allie's Awesome Buckwheat pancake mix by 123 Gluten Free for this recipe and it worked perfectly. However, if you prefer you can try another type of mix but keep in mind any additional allergens your guests may have (soy, dairy, legumes etc) since many gluten free mixes contain these ingredients. Also, the pancake mix I used had 150 calories per 1/3 cup so you may need to adjust the nutrition information depending on the brand you use.

Tuesday, October 9, 2012

Cheesy Pumpkin Quesadillas

Cheesy Pumpkin Quesadillas were created as a way to use up leftover corn tortillas, in addition to using my all time favorite ingredient- pumpkin. It seemed like it would be a tasty and quick dinner but I never expected the quesadillas to be so amazing. The recipe may look deceivingly simple but sometimes the easiest recipes create the best dishes which is certainly the case here. Trust me, you need to try these quesadillas. They're perfectly crisp on the outside with a slightly spicy and gooey pumpkin filling. It's the perfect autumn meal!

Cheesy Pumpkin Quesadillas
Gluten Free
Serves One

Ingredients--
1 wedge Laughing Cow Light Swiss cheese
1/4 cup pumpkin puree
1/4 tsp. paprika
dash of hot sauce, to taste
salt and pepper
2 (six inch) corn tortillas, check for gluten
1 light mozzarella string cheese, torn into small pieces

1. In a small bowl stir together Laughing Cow, pumpkin, paprika, hot sauce, salt and pepper, until well combined.

2. Spray a medium nonstick skillet with nonstick spray and heat to medium low.

3. Lay tortillas flat on a clean, dry surface. Spread half of the pumpkin mixture onto the left side of one tortilla, leaving a small border around the edge. Sprinkle pumpkin evenly with half of the string cheese. Fold right side of the tortilla over filling, forming a quesadilla. Repeat with remaining tortilla and filling so you have two quesadillas.

4. Place tortillas in skillet and cook 4-5 minutes, or until golden and toasty on the bottom. Use a spatula to gently flip the tortillas, and continue to cook, 3-4 minutes or until golden on all sides and filling is heated through.

5. Cut each quesadilla in half to form two wedges and enjoy.

Nutrition Information--approximately 215 calories per serving (entire recipe)

Monday, October 8, 2012

Sweet and Spicy Citrus Tilapia

Tilapia is an easy way to incorporate more seafood into your diet since it is typically one of the cheapest fish and can be cooked quite quickly. On the other hand, if not prepared properly, tilapia can be a touch bland. Sweet and Spicy Citrus Tilapia from Cooking Light solves this issue by marinading the fish in an easy citrus marinade prior to cooking it. The marinade adds a nice punch of flavor to the tilapia, in addition to keeping it moist and delicious.


Sweet and Spicy Citrus Tilapia
Gluten Free
Serves Four

Ingredients--
4 (6-ounce) tilapia fillets
1 teaspoon paprika

Marinade:
1/3 cup fresh orange juice (about 1 orange)
1 teaspoon orange zest
3 tablespoons fresh lime juice
1 teaspoon lime zest
1 tablespoon brown sugar
1 tablespoon extra-virgin olive oil
3 teaspoons gluten free soy sauce
1/2 teaspoon salt
1/2 teaspoon ground cumin
1/4 teaspoon black pepper
1/4 teaspoon crushed red pepper flakes
1/2 tsp. garlic powder


1. Spray a 9x13 glass dish with nonstick spray and arrange tilapia in a single layer on the bottom of the dish.

2. In a small bowl, combine all marinade ingredients. Pour marinade over fish, turning fillets to coat them on all sides. Let stand 15 minutes.

2. Preheat broiler.

3. Sprinkle tops of tilapia with paprika. Broil 15 minutes or until fish flakes easily with a fork.

4. Plate tilapia  and drizzle additional sauce over each fillet.

Nutrition Information--approximately 225 calories per serving (1/4 of the recipe)

Thursday, October 4, 2012

Roasted Eggplant and Tomato Soup

Roasted Eggplant and Tomato is the perfect warm and comforting meal for a rainy autumn day. The creamy soup, which is a slight variation of a recipe from SimplyRecipes.com, boosts a hint of curry and spice to complement the vegetables. Furthermore, the flavor of the vegetables is dramatically enhanced by roasting them in the oven until they are perfectly caramelized. Finally, to achieve the ideal soup consistency, half of the vegetables are puréed to velvety smoothness with the remaining vegetables being stirred in for the perfect texture.

Roasted Eggplant & Tomato Soup
Gluten Free
Serves Three (as a main course)

Ingredients:
1.5 lbs roma tomatoes, (about 7), tough stem point removed, and tomatoes halved lengthwise
1/2 lb carrots, (about 2 medium carrots) cut into 3/4-inch pieces
2 garlic cloves, minced
1 Tbsp olive oil, divided
1 medium eggplant, (about 1 lb), cut into 3/4-inch chunks
3/4 cup canned chickpeas, drained and rinsed
2 teaspoons curry powder
1/2 tsp cumin
1/2 tsp chili powder
2- 2.5 cups low sodium chicken broth
1 tsp. dried parsley
Coarse salt and ground black pepper


1. Preheat oven to 425°F, with racks on top and bottom of the oven. On one rimmed baking sheet, toss together tomatoes, carrots, garlic, 1.5 tsp. oil, 1/2 teaspoon salt, and 1/4 teaspoon pepper. Spread out vegetables on the baking sheet in a single layer, with the tomatoes cut sides down.

2. On another rimmed baking sheet, toss together the eggplant, chickpeas, curry powder, cumin, chili powder,remaining 1.5  tsp. oil, 1/2 teaspoon salt, 1/4 teaspoon pepper. Spread out in a single layer on the baking sheet. Place both baking sheets in oven (tomato mixture on the top rack). Roast until tender, about 45 minutes, tossing the mixtures halfway through.

3. Using tongs, peel off and discard the tomato skins.

4. Transfer tomato mixture (including juices) to a large pot. Add 1 cup of chicken broth. Use an immersion blender to   puree  mixture until smooth.

5. Stir in the eggplant mixture, 1 more cup of broth, and dried parsley. If soup seems too thick, add additional broth, a couple tablespoons at a time.

6.  Bring soup to a slow boil over medium- high heat, stirring occasionally. Reduce heat to medium low, and let soup simmer 5-8 minutes or until ingredients are heated through. Season with additional salt and pepper or spices, if necessary.


Nutrition Information--approximately 245 calories per serving ( 1/3 of the recipe)


Wednesday, October 3, 2012

Shrimp Enchilada Bake

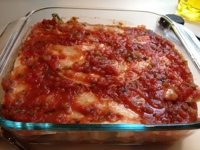
Shrimp Enchilada Bake is a tasty casserole variation of individual enchiladas that was inspired by an Eating Well recipe. This dish contains multiple levels of deliciousness with salsa, shrimp, vegetables, and cheese, layered between corn tortillas and baked to bubbling perfection. This is also the perfect dish to make ahead for busy weeknights when you know you won't have time to cook an elaborate meal. To make this recipe ahead of time simply prepare through Step 7 (covering dish with foil), and place the casserole dish in the refrigerator, for up to 1 day. Allow the cold baking dish to warm slightly before placing in a hot oven.

Shrimp Enchilada Bake
Gluten Free
Serves Four

Ingredients--

1/2 cup canned pinto beans, drained
1/4 tsp chili powder
1/4 tsp. garlic powder
1/4 tsp cumin
3/4 lb pound small-medium cooked shrimp, peeled, tails removed, and diced
3/4 cup frozen green beans, thawed
1 (4-ounce) can chopped green chiles, (not drained)
1.25 cup salsa, divided
1/2 cup crushed tomatoes
5( 6 inch) corn tortillas, cut in half (check for gluten)
1/2 cup reduced-fat Mexican blend or Cheddar Cheese, shredded
1/2 cup fresh parsley, chopped
salt and pepper


1. Preheat oven to 425°F. Coat a 9-by-9-inch glass baking dish with cooking spray.

2. In a small bowl, stir together pinto beans, chili powder, garlic powder, and cumin. Microwave until beans are softened, about 1 minute. Using a fork or potato masher, mash the pinto beans until they are beginning to smash but still have a  slightly chunky texture. Set aside.

3. Combine shrimp, corn, chiles and 1/4  cup of the salsa in a microwave-safe medium bowl. Cover and microwave on High until heated through, about 2 1/2 minutes.

4. While the shrimp mixture is microwaving, stir together the remaining cup of salsa and the crushed tomatoes. Season with salt and pepper.

5. Spread half of the salsa/tomato mixture (about 3/4 cup) in the prepared baking dish. Top with a layer of 5 tortilla halves (see picture below).

6. Spread mashed beans evenly over the tortillas. Top the beans with the shrimp mixture, followed by the remaining 5 tortilla halves.

7. Pour the remaining salsa/tomato sauce over the tortillas. Cover with foil.

8. Bake the casserole until it begins to bubble on the sides, about 20 minutes.

9. Remove the foil; sprinkle cheese on top. Continue baking until heated through and the cheese is melted, about 5 minutes more.

10. Top with parsley and serve!


Nutrition Information--239 calories per serving (1/4 of the casserole)

Tuesday, October 2, 2012

Brownie Batter Stuffed French Toast

There isn't really an interesting story or recipe that inspired today's dish. I was simply in the mood for a sweet breakfast dish and this recipe was the amazing result. In this strangely fantastic blend of brownies and breakfast, slices of French toast are sandwiched between a decadent chocolate filling.

Brownie Batter Stuffed French Toast
Gluten Free
Serves One

Ingredients--
3 tbsp. liquid egg substitute
2 slices light gluten free sandwich bread
1/8 tsp. pure vanilla extract

Brownie Batter Filling:
2 tbsp. canned pumpkin puree
2 tsp. unsweetened cocoa powder
2 packets of Truvia sweetener
1/8 tsp. pure vanilla extract
2 tsp. unsweetened original almond milk
Optional Toppings-- pancake or maple syrup, chocolate syrup, whipped cream, fresh fruit

1. In a small bowl, stir together all of the filling ingredients (pumpkin, cocoa, Truvia, vanilla, and milk) until well combined. Set aside.

2. Pour egg substitute into a shallow bowl that is large enough to fit a bread slice. Stir in vanilla extract.

3. Spray a small skillet with nonstick spray and bring to medium heat.

4. While the skillet is heating up, lay the bread slices flat on a clean, dry surface. Evenly spread brownie batter onto one slice of bread then top with remaining slice to form a sandwich.

5. Carefully dip sandwich into egg and let soak for about 20 seconds per side. Coat the edges of the sandwich as well.

6. Transfer french toast sandwich to skillet and cook until golden brown on the bottom, 4-5 minutes. Use a spatula to gently flip the sandwich, then cook 3-4 more minutes or until golden brown on both sides.

7. Plate French toast and serve with desired toppings.


Nutrition Information--approximately 140 calories per serving (with no toppings)


Monday, October 1, 2012

Mozzarella Stuffed Turkey Burgers

Turkey burgers are often thought of as bland and boring but this recipe, adapted from Eating Well, proves that when cooked properly, they can be quite scrumptious. Mozzarella Stuffed Turkey Burgers is a genius mash-up of pizza and burgers that creates a delectable burger that your whole family can enjoy. The perfectly seasoned turkey burgers are stuffed with cheese and fresh basil, then topped with marinara sauce and more cheese, and finally sandwiched between toasted bread.

Mozzarella-Stuffed Turkey Burgers
Gluten Free
Makes Three Burgers


Ingredients--
3/4 lb extra lean ground turkey
3 tbsp scallions, finely chopped
1 clove of garlic, minced
1.5 teaspoons Worcestershire sauce
3/4 teaspoon lemon zest
1/4 teaspoon dried oregano
1/4 teaspoon freshly ground pepper
1/4 teaspoon salt
6 tbsp. part skim mozzarella cheese, shredded
1.5 tablespoons fresh basil, finely chopped
6 slices gluten free sandwich bread
1/2 cup low-fat marinara sauce, check for gluten

1.To prepare burgers: Place scallions, garlic, Worcestershire sauce, lemon zest, oregano, 1/2 teaspoon pepper and 1/4 teaspoon salt in a large bowl. Mix until well combined.

2. Add in ground. turkey. Gently combine with your hands, without over mixing  until evenly incorporated. Form into 8 thin patties about 4-inches wide and 3/8 inch thick.

3. Combine 3 tbsp.cheese and basil in a small bowl. Place an equal amount of mixture in the center of 4 patties. Cover with the remaining patties and crimp the edges closed (so cheese mixture is enclosed in the center).

4. Preheat grill pan (or large skillet) to medium heat. Add burgers and cook, 4-5 minutes per side, or until turkey is cooked through.

5. While the burgers are cooking,  place the marinara sauce in a small saucepan and heat over medium-low heat on the stove.

6. Toast the bread slices.

7. To assemble the burgers, spread 3 slices of bread with about 1 tbsp.marinara sauce, then top with a burger,1 tbsp. more of marinara sauce, and 1 tbsp of cheese. Top the burgers with the remaining slices of bread.

Nutrition Information--approximately 210 calories per serving