Pages

Foodie Blogroll

Tuesday, January 31, 2012

BBQ Portobello Quesadillas

Veggie-Que
Who needs pulled pork when you have portobello mushrooms? The meaty mushrooms are the perfect meat substitute in this BBQ recipe from Eating Well Magazine. Carmelized mushrooms are smothered in a smoky, barbeque sauce then sandwiched between  toasty tortillas to form a flawless meal.


BBQ Portobello Quesadillas
Gluten Free
Serves 1


Ingredients--
2 portobello mushrooms, gills removed and diced into small pieces
1/4 cup barbecue sauce (see recipe below)
1 tsp. chipotle pepper in a adobo (adjust according to heat preference)
1 tsp. apple cider vinegar
1 tsp. tomato paste
3 small corn tortillas (check for gluten)

1. Spray a large skillet (cast-iron works well) with nonstick spray and heat over medium heat.

2. Add diced mushrooms and cook until mushrooms are golden brown, stirring occasionally (about 10 minutes).

3. While the mushrooms are cooking, combine barbecue sauce, chipotle pepper, vinegar, & tomato paste in a medium bowl.

4. Remove mushrooms from pan and transfer to bowl with barbecue sauce. Stir until mushrooms are thoroughly coated in sauce.

5. Wipe out skillet, respray, and reheat to medium heat.

6. Lay tortillas on a clean, flat surface (like a cutting board) and spoon 1/3 of the mushroom filling onto one side of one of the  tortillas. Fold over remaining side to form a quesadilla. Repeat with other tortillas.

7. Gently place quesadillas in pan. Cook for 2-3 minutes, until golden brown. Press down with spatula from time to time.

8. Use the spatula to flip the quesadillas and cook for 2-3 minutes more.

9. Transfer quesadillas to plate and cut into wedges.

Nutrition Information--approximately 220 calories per serving


HG Barbecue Sauce
Gluten-Free
Makes about 6 tbsp.

Ingredients--
1/4 cup crushed tomatoes
2 tbsp. ketchup
2 tsp. brown sugar (not packed)
2 tsp. cider vinegar
1/2 tsp. garlic powder

Combine all ingredients in a small bowl and mix well. Store in a covered container in the refrigerator.

Nutrition Information-- about 13 calories per tbsp.


Monday, January 30, 2012

Angel Food Cake

Million Dollar Dessert
My culinary consultant found this recipe for low-carb, gluten-free angel food cake in the local newspaper. The directions look quite strange but somehow it works and the finished product is  light, airy perfection. The cake requires quite a few specialty ingredients so it can get a little pricey but the good news is that you only use a little bit of each ingredients  so they will last for a long time. You can find the unusual ingredients in a specialty food store or on Amazon (often cheaper).

Angel Food Cake
Gluten Free
Serves 8


Ingredients--

12 egg white (or 2 cups liquid egg whites)
1 tsp cream of tartar
1 tsp xanthan gum
1 tsp guar gum
1/4 tsp baking powder
8 packets Truvia sweetener
1 tsp vanilla extract
1 tsp almond extract
1/4 cup vanilla whey-based (or egg-based) protein powder
1/4 cup almond flour
3 tbsp powdered egg whites

Optional Toppings--whipped cream, fresh fruit, ice cream

1. Preheat the oven to 350 degrees. Generously coat a large flute pan with cooking spray on the center and bottom only (NOT the outer sides of the pan).

2. In the bowl of a stand mixer, combine liquid egg whites, cream of tartar, xanthan gum, guar gum, baking powder, Truvia, and both extracts (vanilla and almond).

3. Beat on low for 30 seconds, then increase mixer to high and beat until very still peaks from, about 4 minutes. (Mixture will be airy, voluminous and quite thick)


4. Meanwhile, in a small bowl sift together the protein powder, almond flour, and powdered egg whites.

5. Once stiff peaks are reached, sprinkled half of the dry ingredients over the egg whites. Run the mixer at medium speed for 5-10 seconds or just until the dry ingredients are incorporated.

6. Sprinkle the remaining dry ingredients over the egg whites and mix again just to incorporate.

7. Increase the mixture speed to high and run for another 5 seconds.

8. Use a silicone spatula to scrape the sides of the bowl and gently fold the mixture together once or twice. Transfer half of the mixture to the prepared pan, then use the spatula to smooth the top. Repeat with the remaining mixture.

9. Firmly tap the pan on the counter to help eliminate air bubbles.

10. Bake for 35 minutes. Remove pan from the oven and overturn the pan on a cooling rack. Let cool completely.

11. Once cake is cooled, run a paring knife along the outside of the pan to release.Cut into 8 slices & enjoy!


Nutrition Information--80 calories, 15 calories from fat, 2 grams fat, 4 grams carbs, 14 grams protein
(per 1/8 cake without any toppings)

Sunday, January 29, 2012

Sweet Potato Spring Rolls With Teriyaki Sauce

Far East Feast
These scrumptious sweet potato spring rolls may not be authentic but that doesn't mean they don't taste amazing. They do require a bit of time for assembly but many of the components can be prepared ahead of time. Plus it's worth the effort for such a unique and impressive dish.

Sweet Potato Spring Rolls With Teriyaki Sauce
Gluten Free
Makes approximately 6 rolls


Ingredients--

6-8 rice paper rounds (can be found at Asian markets or specialty grocery stores)
1 small sweet potato, peeled and cut into matchsticks
1 large carrot, peeled and cut into matchsticks
1 tbsp toasted seasame seeds*
1 package Miracle Noodles
1 Recipe Teriyaki Sauce (recipe below)
crushed red pepper, to taste
salt & pepper

*You can toast seasame seeds by placing them in a dry skillet over low heat. Cook for a few minutes, stirring often, until seeds are slightly browned and smell toasted.


Prepare the Vegetables--
1. Preheat oven to 375 degrees.

2. Place carrots and sweet potatoes on a baking sheet and spray with nonstick spray. Season with salt, pepper, and crushed red pepper to taste.

3. Roast vegetables about 15 minutes, or until slightly browned. Stir halfway through.

4. Remove vegetables from oven and set aside to cool.
(Can be made ahead of time and refrigerated until ready to use. Bring to room temperature before placing in rolls)

Prepare the Noodles--
1.  Strain the miracle noodles and dry thoroughly with paper towels. Use kitchen shears to cut noodles into smaller pieces.

2. Microwave for 1 minute.

3. Stir in 2 tbsp. teriyaki sauce and 1 tbsp. of toasted seasame seeds.
(Can be made ahead of time and refrigerated until ready to use. Bring to room temperature before using)

Assemble the Rolls--
1. Preheat the oven to 400 degrees. Line a small baking dish with parchment paper. Fill a shallow dish with very warm water (large enough to fit the rice paper). Lay a clean, damp kitchen towel beside water dish to use as the work surface for rolling the rolls.

2. Set up the ingredients in an assembly line so they are within easy reach of water dish and towel ( noodles, carrots, and sweet potatoes). You will also need a clean plate to set prepared rolls on.

3. Soak a rice paper round in water dish for 15-20 seconds, until it becomes soft and pliable. (Be sure to get all sections including the edges).

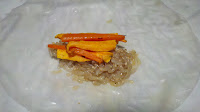
4. Lay rice paper flat on kitchen towel. Place about a small mound of noodles, centered on the paper, about 2 inches from the bottom.


5. Top with a few sticks each of carrots and sweet potatoes.


6. Roll up the bottom of the paper so filling is covered. Fold in sides. Finish rolling up noodles. Place on a clean  plate, seam side down. (Method is similar to rolling a burrito).


7. Continue rolling until you run out of one of the ingredients. (Depending on how you divide things up, one may run out first. You should end up with 6-8).


8. Carefully transfer rolls to prepared baking sheet. Bake until rolls are beginning to crisp and turn golden, about 12 minutes. Flip rolls halfway through.

9. Let rolls cool a few minutes prior to serving. Serve with remaining teriyaki sauce for dipping.


Teriyaki Sauce--


Ingredients--

2 tbsp. mirin (can be found at Asian markets or specialty grocery stores)
2 tbsp. gluten free soy sauce
1 tbsp. Truvia sweetener


Combine all the teriyaki sauce ingredients in a small saucepan. Cook over low heat, stirring occasionally, until Truvia dissolves. The sauce can be made ahead of time and stored in a sealed container in the refrigerator until ready to use.


Thursday, January 26, 2012

Egyptian Lentil Soup

Walk Like An Egyptian
I adapted this super simple lentil soup  from a February Food & Wine article focusing on Egyptian cuisine. Known as Shorbet Ads in it's country of origin, this recipe elevates a few simple ingredients to pure deliciousness. It doesn't require a lot of work either as the majority of the time is spent letting the lentils simmer.

Egyptian Lentil Soup
Gluten Free
Serves 2


Ingredients--
1/2 small onion, chopped
1/2 medium carrot, chopped
1 garlic clove, minced
1/2 tsp. cumin
1/4 tsp. ground coriander
1/4 tsp. chile powder
1/2 cup lentils
1/2 cup diced tomatoes, drained
2.5 cups low-sodium chicken broth, divided

1. Spray a medium pot with nonstick spray and bring to medium heat.

2. Add the onion, carrot, and garlic and cook, stirring often, until softened (about 5 minutes).

3. Add 1 tbsp. of water along with the spices (cumin,coriander, and chile powder). Cook, stirring constantly, for 2-3 minutes or until fragrant.

4. Add the tomatoes and cook for 2 minutes.

5. Stir in the lentils and 2 cups of chicken broth. Season with salt and bring to boil.

6. Reduce the heat to medium-low and simmer until the lentils are very soft, about 30 minutes.

7. Once lentils are tender, stir in the remaining 1/2 cup of chicken broth. Use an immersion blender to puree the soup until relatively smooth. Season with additional salt, if necessary.

Nutritional Information-- approximately 150 calories per serving

Wednesday, January 25, 2012

Easy Breezy "Cheezy" Sauce

Vegan Paradise
I was highly doubtful about this recipe but it is peculiarly tasty. The cheese sauce, from Isa Chandra Moskowitz, is made with absolutely no cheese. Instead, it utilizes a vegan staple- nutritional yeast. This isn't the same yeast you would bake bread with but rather a deactivated yeast that's full of protein and nutrients. You can find it in most health food stores, just be sure to check for gluten. An added bonus? It's a lot easier to make than traditional cheese sauce.

Easy Breezy "Cheezy" Sauce
Gluten Free
Two Servings


Ingredients--
3 tbsp. nutritional yeast
1 tbsp. gluten-free all purpose flour
1/2 tsp. garlic powder
1/8 tsp.ground turmeric
1/2 cup vegetable broth
1/4 tsp. dijon mustard
1/8 tsp. salt

1. Place the nutritional yeast, flour, garlic powder, salt, and turmeric in a bowl and mix well.

2. Add the broth and mix well with a whisk to remove any lumps.

3. Once mixture is smooth, pour into a small saucepan.

4. Turn up the heat to medium-high and cook, stirring often, for about 5 minutes.

5. Once it comes to boil, reduce the heat to a simmer (sauce should be thickening and bubbling). Cook for another 5 minutes, stirring almost constantly, until it has a thick, smooth, melted cheese consistency.

6. Stir in the mustard and taste for salt.


(Nearly) Instant Dinner-- Mix together miracle noodles, roasted broccoli, and Miracle Noodles for a nutritious take on Macaroni & Cheese.


Tuesday, January 24, 2012

Fish & Chips

Pub Grub
If you're craving some greasy  Fish & Chips, try this Hungry Girl Fish & Chips makeover recipe instead. You still get crispy fish strips and salty fries but in a much healthier package. To achieve the perfect gluten-free breading, I used a combination of finely ground Chex and fluffy homemade bread crumbs.

Fish & Chips
Gluten Free
Serves Two


Fish--
Ingredients--
3/4 lb (12 oz) cod, cut into even strips (about 8)
2/3 cup Corn Chex
1/4 cup homemade bread crumbs (see recipe below)
1/2 cup liquid egg substitute
1/2 tsp. garlic powder
1/2 tsp. Old Bay Seasoning
salt & pepper
Turnip Fries (see link below)
Optional Sauces--ketchup and tartar sauce

1. Preheat oven to 450 degrees. Spray a slotted broiler pan with nonstick spray (or place a cooling rack in a rimmed cookie sheet)

2. In a small food processor, grind Chex to a breadcrumb-like consistency. Transfer to a shallow dish.

3. Stir in breadcrumbs, garlic powder, Old Bay, salt, and pepper. Mix well.

4. Place fish strips on a plate, and cover with egg substitute, turning fish over to coat evenly.

5. Give one fish stick a gentle shake, then transfer to the breadcrumb mixture. Turn to coat on all sides than move to prepared pan. Repeat with remaining fish.

6. Spray tops of fish sticks with nonstick spray.

7. Place in oven and bake for 15 minutes, or until fish is flaky and the tops of the strips are brown.

8. Plate fish beside "chips". Serve with ketchup and tartar sauce for dipping, if desired.

Chips--
Turnip Fries (You can also use this method to make butternut squash fries)
http://spicysweetpotato.blogspot.com/2011/12/turnip-takeover.html


Homemade Breadcrumbs

Toast 1 slice Light Gluten Free Sandwich Bread. Break into pieces and place in small food processor. Sprinkle with salt & pepper. Pulse until bread crumb consistency is reached. Makes approximately 1/4 cup.

Monday, January 23, 2012

Faux Soy Sauce

Soy Joy
This soy sauce alternative from Kim Barnouin, tastes shockingly similar to the real stuff. It's a great substitute for people who are allergic to soy or are watching their sodium intake.

Faux Soy Sauce
Makes Approximately 3 Servings
Gluten Free

1 cup molasses
1/4 cup + 2 tbsp. balsamic vinegar
1.5 tsp sugar or Truvia

Combine all ingredients in a small bowl. Stir well. Store, refrigerated, in an airtight container or jar.

Sunday, January 22, 2012

Unfried Fried Rice

Fry It Up
Who would have thought it's possible to make nutritious fried rice? Well it certainly is and I'm here to tell you that this version based on a recipe by Heather Von Vorous, is phenomenal. The brilliant part of this fried rice is that you can easily vary the dish each time you make it. So feel free to throw in whatever leftover vegetables you have on hand or  even add in some protein like shrimp. Oh and the fish sauce really adds a one of a kind  flavor so I recommend using it but if you don't think it's worth buying, you could just substitute more soy sauce. Fish sauce can be found in the Asian section of most supermarkets.

Unfried Fried Rice
Gluten Free
Serves 1


Ingredients--
1/4 cup jasmine rice
1 garlic clove
1/4 tsp. canola oil
2 tbsp. onion, diced
1/4 cup carrots, diced
1/4 cup zucchini, diced
1/4 cup mushrooms, diced
1 tbsp. liquid egg subsitute
2 tsp. gluten free soy sauce
1.5 tsp. fish sauce
1/2 tsp. brown sugar
freshly ground black pepper
coarse salt
1/4 cup frozen peas, defrosted
lime juice

1. Cook the rice according to package directions and let cool. (You can prepare the rice ahead of time and refrigerate until ready to use).

2. Rinse your hands in cold water (to prevent the rice from sticking to them) and knead the cold rice gently to separate the grains.

3. Peel the garlic clove, and mince. Sprinkle with coarse salt and use the back of your knife to press the garlic into a paste (move the blade of the knife from side to side).

4. Set a nonstick pan over medium-high. Make sure all of your ingredients are chopped and within easy reach.

5. Once the pan is hot, swirl in oil and spray with nonstick spray.

6. Add the garlic paste, onion, carrot, zucchini, and mushrooms. Stir-fry until the onion is transparent and the carrots are crisp-tender (5-7 minutes).

7. Push the vegetables to one side of the skillet and pour egg into the opposite side. Stir egg until cooked, then mix into vegetables.

8. Add the rice and stir well, then press the rice mixture into the bottom of the pan. Let fry for several minutes until it begins to turn golden brown.

9. Use a spatula to turn the mixture over. Stir the rice than press the mixture into pan again.

10. While the rice is cooking, stir together the soy sauce, fish sauce, brown sugar, and pepper.

11. Pour the sauce into the rice. Stir-fry for 2-3 minutes more.

12.Stir the peas into the rice. Remove from heat and finish with a sprinkle of lime juice.

Nutrition Information--approximately 250 calories per serving

Friday, January 20, 2012

Baja Shrimp Fajitas

Back to Baja
Baja Shrimp Fajitas are a cinch to throw together but your guests will never be able to tell since they're sizzling with flavor. These fantastic fajitas, based on a recipe from Heather Van Vorous, make the perfect party food since you can create an interactive dinner party and let the diners choose their own topping. The possibilities are limitless ranging from guacamole to salsa . The recipe is only for 1 serving but it can easily be multiplied to serve your exact number of guests.

Baja Shrimp Fajitas
Gluten Free
Serves 1


Ingredients--
4-6 oz. shrimp, shelled and deveined
Gluten Free Tortilla (Corn, Brown Rice, etc)
Optional Toppings--salsa, hot sauce, guacamole, diced onion, black bean dip, onion, jalapeno

Marinade:
1 tbsp. lime juice
1 tbsp. orange juice
3/4 tsp. extra virgin olive oil
1 clove garlic, minced
1/4 tsp. chili powder
a few sprigs fresh cilantro or parlsey, chopped

1. In a small bowl, stir together the ingredients for the marinade. Add the shrimp and stir until they are coated in the marinade.

2. Let shrimp marinate for 20 minutes, then remove shrimp and discard marinade.

3. Grill or saute shrimp until cooked through (about 2 minutes per side).

4. Serve shrimp on tortillas and allow each person to customize their fajitas with the optional toppings.


Thursday, January 19, 2012

Balsamic Glazed Roasted Mushrooms

Find Your Inner Chef
Balsamic Glazed Roasted Mushrooms has no measurements since the exact quantities of the ingredients aren't too important. This effortless side dish can easily be varied to serve two or ten and can also be modified to fit your exact preferences. Since there are so few ingredients, it's worth it to buy the highest quality ingredients. So don't be cheap and make sure you buy the Fleur de Sel! (a coarse French sea salt)

Balsamic Glazed Roasted Mushrooms
Gluten Free

Ingredients--
cremini mushrooms
Fleur De Sel
Balsamic Vinegar

1. Preheat oven to 400 degrees. Line a baking sheet with aluminum foil but don't add any nonstick spray.

2. Be sure the mushrooms are completely dry and place in a single layer on baking sheet, stems facing up.

3. Roast mushrooms 20 minutes. Remove pan from oven and carefully flip mushrooms.

4. Return pan to oven and roast 20 minutes more, or until mushrooms are golden brown all over.

5. Transfer mushrooms to serving dish. Drizzle with balsamic vinegar and sprinkle with Fleur de Sel.


Wednesday, January 18, 2012

Duo Of Banana French Toast

#1 Fruit Award
My favorite food of the moment is bananas so I decided to create a french toast that would highlight their magnificence. French toast is delicious on it's own but when add roasted bananas and a maple-banana syrup it's phenomenal. So next time you're in the mood for something super sweet and bursting with bananas, try this unbelievable recipe.

Duo Of Banana French Toast
Gluten Free
Serves 1


Ingredients--
1 banana
3 tbsp. sugar free maple syrup
2 slices light gluten free sandwich bread
1/4 cup liquid egg substitute
1/2 tsp cinnamon, divided
1/4 tsp. almond (or vanilla) extract

Optional toppings--whipped cream, walnuts, additional syrup

1. Preheat oven to 400 degrees.

2. Cut in banana in half. Place one half (still in the peel) on a small square of aluminum foil. Transfer to the oven and bake for 20-25 minutes or until peel is brown all over (don't worry, it tastes better than it looks).

3. While the banana is roasting, begin the rest of the components. Peel the remaining half of the banana and cut into thin slices. Add banana slices to a small pot along with maple syrup, and 1/4 tsp. of the cinnamon.

4. Stir mixture and set over low heat. Let the mixture heat through, stirring occasionally, while you prepare the bread. 

5. In a shallow dish combine egg substitute, extract, and remaining 1/4 tsp of cinnamon. Mix well.

6. Spray a skillet with nonstick spray and bring to medium heat.

7. Dip the bread slices in the egg mixture, coating them thoroughly, then transfer to skillet.

8. Cook 3-4 minutes or until golden brown. Flip bread and cook until second side is golden, 2-3 more minutes.

9. To assemble french toast, place bread on a large plate. Peel roasted banana then scoop out the banana and spread on bread. Top with banana-maple syrup mixture and any optional toppings.

Nutrition Information--approximately 240 calories per serving

Tuesday, January 17, 2012

Edamame Pesto

When Italy Met Japan
What happens when you cross Italian pesto with Japanese ingredients? Edamame pesto is born! This unconventional pairing from Isa Chandra Moskowitz produces a surprisingly creamy and luscious sauce. Try it on top of gluten-free noodle, rice, or vegetables.

Edamame Pesto
Gluten Free
Serves 2


Ingredients--
1 garlic clove, minced
1/2 cup packed basil leaves
7 oz. frozen shelled edamame, thawed
1/2 cup low-sodium chicken or vegetable broth, check for gluten
1 tbsp. lemon juice
1/2 tsp. extra virgin olive oil
1/4 tsp. salt
Optional Topping--1 tsp. grated Parmesan cheese

1.  Place the garlic and basil in a small food processor and pulse a few times until they are chopped.

2. Add the remaining ingredients and blend until relatively smooth. Stop to scrape down the sides a few times to make sure everything gets incorporated. If the pesto seems too stiff, add a little more broth. Top with cheese if desired


Nutrition Information--approximately 130 calories per serving


Monday, January 16, 2012

Grilled Teriyaki Salmon

Simple Salmon
When you need a speedy way to cook salmon, this recipe is for you. The salmon is grilled to perfection in a matter of minutes and topped with a teriyaki sauce for maximum flavor with minimum effort.

Grilled Teriyaki Salmon
Gluten Free
Serves 2


Ingredients--
Teriyaki Sauce:
2 tbsp. gluten free soy sauce
1 tbsp. mirin (available in the Asian section of most supermarkets)
1.5 tbsp. white vinegar
1/2 tbsp. fresh ginger, grated
1/4 tsp. garlic powder
1 tbsp. honey

2 (4 oz.) salmon filets
salt & pepper

1. Preheat a grill pan to medium-high heat.

2. Prepare the teriyaki sauce by whisking together all of the sauce ingredients in a small bowl. Set aside.

3. Spray grill pan with nonstick spray. Season salmon filets with salt & pepper

4. Grill salmon for 3-4 minutes per side, or until grill marks appear and fish flakes easily

4. Drizzle with teriyaki sauce and enjoy!


Sunday, January 15, 2012

Homemade Applesauce

Just Like Mom Makes
Who knew applesauce was so simple to make? Once you try this warm, homemade applesauce it will be difficult to eat the stuff from the jar!

Homemade Applesauce
Gluten Free
Serves Two


Ingredients--
2 Granny Smith or Macintosh apples, peeled, cored, and chopped into small pieces
1/4 cup Truvia,

1. Place apples in a medium saucepan. Add just enough water to cover the apples.

2. Place saucepan on the stove over high heat and bring mixture to a boil, stirring occasionally.

3. Reduce heat to medium and partially cover with a lid. Let apples simmer until very tender, 20-25 minutes, stirring occasionally.

4. Use a potato masher to mash apples to your preferred consistency (I like mine to have a bit of texture.
Stir in Truvia and mix well.

Nutrition Information--approximately 100 calories per serving

Thursday, January 12, 2012

Breakfast Rice Pudding

Rice-a-Palooza
This delightful rice pudding from Hungry Girl is good anytime of the day whether you want a warm breakfast treat or cold afternoon snack. In my opinion, rice is a pretty bland ingredient but this recipe adds a ton of flavor to it. The rice simmers in a milk broth to form creamy concoction that  tastes like a dessert risotto. Delicious!

Breakfast Rice Pudding
Gluten Free
Serves Two


Ingredients--
1.5 cups cooked brown rice
2.5 cups unsweetened Silk PureAlmond milk
3 tbsp. Truvia sweetener
1 teaspoon cornstarch
dash of salt
2 tbsp. liquid egg substitute
1/2 tsp. Promise butter spread
1/2 tsp. vanilla extract
1 tsp. cinnamon

Optional Toppings--brown sugar, maple syrup, extra cinnamon

1. In a medium saucepan, combine rice, 2 cups milk, Truvia, cornstarch, and salt. Bring to a low boil, stirring occasionally.

2. Once boiling, reduce heat to medium high. Continue to cook for 10-15 minutes,stirring frequently, until thick and creamy.

3. Meanwhile, in a small bowl, combine egg substitute, Promise, vanilla extract, cinnamon, and remaining 1/2 cup milk. Mix well.

4. Once the mixture in the pot is thick and creamy, add egg mixture and stir well.

5. Cook for 5 minutes, stirring frequently, until mixture returns to a thick and creamy consistency.

6. Divide evenly between two bowls and top with any desired optional toppings.

Nutrition Information--approximately 285 calories per serving

Wednesday, January 11, 2012

Smashed Sweet Potatoes

A Smashing Success
When you need a break from baked sweet potatoes but don't have extra time to invest, try this recipe for  mashed sweet potatoes. It's hard to believe something this creamy and delicious can be made in the microwave!

Smashed Sweet Potatoes
Gluten-Free
Serves 1


5-6 oz. sweet potato, cut into 3/4 inch chunks (leave the skin on)
2 tbsp. unsweetened Silk PureAlmond milk
salt & pepper to taste


1. Place the sweet potato is medium microwave-safe bowl. Cover & microwave on high for 4-6 minutes or until very tender.

2. Remove potatoes from microwave using a potholder.Add in milk and salt & pepper. Use a potato masher to mash the potatoes until desired texture is reached and ingredients are thoroughly mixed.

Nutrition Information--approximately 160 calories per serving

Variations--
Spicy-->add in red pepper flakes and/or hot sauce
Sweet-->add in nutmeg, cinnamon, and/or maple syrup


Tuesday, January 10, 2012

Oat Pizza Crust

Let Them Eat Pizza
The typical homemade gluten free pizza requires a ton of specialty ingredients (flours, binders, etc.) as well as multiple risings. What makes this pizza recipe spectacular is that you probably have the majority of the ingredients in your pantry right now and that it needs ZERO rise time. It may not look exactly like gluten-full pizza but it tastes just as good so who cares? This miraculous, healthy pizza was inspired by a recipe from Bethenny Frankel.

Oat Pizza Crust
Gluten Free
Yields 8 Slices


Ingredients--
1 packet pizza crust yeast (such as the kind by Fleischmann's)
1 cup warm water
2.25 cups oat flour + more for dusting work surface (estimate about 1/4 cup)
1/4 cup ground flaxseed meal + more for adjustments (estimate about 1/4 cup)
1.5 tbsp. extra virgin olive oil
1 tbsp. agave nectar (or honey)
1/2 tsp. salt
1/2 tsp. pepper
1 tsp. dried Italian seasonings
Toppings--marinara sauce & favorite pizza toppings (I used mushrooms, jalapenos & sundried tomatoes)


1. Preheat oven to 450 degrees.

2. In a medium bowl, combine water and yeast. Let sit for 10 minutes to activate yeast.

3. Once yeast is activated, add in 2.25 cups flour, flaxseed, olive oil, agave, salt, pepper, and Italian seasonings.

4. Spray your hands with nonstick spray and then use them to mix the dough together. If dough seems too wet, add a little flaxseed. If dough is too dry, add a touch of water.

5. Once dough is mixed, form into a ball and place on a pizza stone sprayed with nonstick spray and  dusted with oat flour.

6. Roll dough out to about 1/4 inch thickness using a rolling pin sprayed with nonstick spray. Form a raised crust around the edge if desired.

7. Bake crust in the oven for 12-15 minutes or until dough is slightly brown and crispy to the touch.

8. Remove crust from the oven and spread with marinara sauce. Top with desired toppings and return to oven.

9. Bake for an additional 8-10 minutes or until crust is crisp.

Nutrition Information (for Crust)--approximately 150 calories per slice (8 slices per pizza)

Saturday, January 7, 2012

CocoSquash Rice

A New Trio
I'll be the first to admit that squash, rice, and coconut sounds a bit strange. Nevertheless, the trio of ingredients manages to create a scrumptious side dish that hits every flavor note from sweet to spicy to creamy. It may look a little complex but once the rice and squash are cooked, this recipe comes together really quickly. CocoSquash Rice is a slight adaption from a Isa Chandra Moskowitz recipe.

CocoSquash Rice
Gluten Free
Serves 2


Ingredients--
3/4 cup cooked rice, any variety (I used black "forbidden" rice)
1 medium kabocha squash, (or substitute a pound of your favorite winter squash)
2 tbsp. onion, diced
1 tsp. fresh ginger, grated
1/4 tsp. lime zest
dash of red pepper flakes
1/4 cup light coconut milk
1/2 cup low-sodium chicken broth
1 tsp. lime juice
salt & pepper

Optional Garnish--toasted unsweetened coconut flakes

1. Preheat oven to 400 degrees. Line a large baking sheet with aluminum foil and spray with nonstick spray.

2. Carefully cut the kabocha squash in half. Use a large spoon to scoop out the seeds and flesh. Spray both halves with nonstick spray and season with salt & pepper.

3. Place squash halves cut side down on the baking sheet. Roast for 40-45 minutes or until very tender when pierced with a fork. Remove from oven and let cool.

4. Preheat a medium skillet to medium heat. Spray with nonstick spray and saute the onion until softened, about 5 minutes.

5. Respray the pan and add the ginger, garlic, lime zest, red pepper flakes. Season with salt and saute another 2 minutes. Turn the heat down to low.

6. Scoop the flesh out of the squash and add it to the pan along with the coconut milk. Use a potato masher to mash the mixture into a creamy consistency.

7. Add the cooked rice and stir well, then add the broth. Stir until mixture is evenly mixed. Add the lime juice, and salt and pepper, if necessary. Garnish with coconut flakes (optional) prior to serving.


Tomato & Fennel Soup

Tomato Soup for the Soul
Tomato soup is warm and comforting but it can also be a tad boring. If you want to jazz up tomato soup,  try this delicious recipe for Tomato & Fennel Soup. The fennel adds an entirely new dimension of flavor in addition to being a nutrient powerhouse. The soup requires a little care and attention to develop the flavors  but its worth it when you taste it!

Tomato & Fennel Soup
Gluten Free
Serves 3


Ingredients--
1 medium fennel bulb
1/2 medium onion, chopped
1 garlic clove, minced
1/2 teaspoon cumin seeds
2 (14.5 oz) cans diced tomatoes
8 oz. crushed tomatoes
1.25 cups low sodium chicken broth, check for gluten
salt & pepper
crushed red pepper flakes, optional

1. Trim the fennel and reserve the fronds. Coarsely chop the fennel bulbs.

2. Spray a large saucepan with nonstick spray & heat over medium heat. Add the onion and chopped feenl. Cook, stirring frequently, until the vegetables are quite tender, about 15 minutes. Respray with nonstick spray, if necessary.

2. Add the fennel seeds, and continue cooking for 3 minutes more. Stir in the garlic and cook for one more minute. Season to taste with salt and pepper. Add in red pepper flakes to taste if desired.

3. Add the crushed tomatoes, diced tomatoes, and broth. Partially cover the pot and bring to simmer. Reduce heat to medium low and simmer the soup for 30 minutes.

4.Use an immersion blend to puree the soup until silky smooth (or let the soup cool and carefully use a blender).

5. Serve garnished with fennel fronds.

Friday, January 6, 2012

Spinach & Mushroom Risotto Cakes

Risotto Renovation
Prepare to amaze your guests with this unique take on the classic risotto. Spinach & Mushroom Risotto Cakes have a bit of crunch on the outside that yields to a creamy tender center filled with spinach and mushrooms. One great benefit of risotto cakes is that often dreaded constant stirring of risotto is minimized since the last fifteen minutes of cooking is spent in the oven. This allows you time to finish preparing any other dishes for the meal. Once the cakes are baked, just pop them out of the ramekins for a stunning presentation.

Spinach & Mushroom Risotto Cakes
Gluten Free
Makes 3 Cakes


Ingredients--
1/3 cup Arborio rice
1/2 cup mushrooms, thinly sliced
2/3 cup low sodium chicken broth, check for gluten
2 tbsp. light coconut milk
2 tbsp. scallions, thinly sliced
3 oz. fresh baby spinach leaves
3 tbsp. liquid egg substitute
a few sprigs fresh parsley, chopped
salt & pepper

1. Preheat the oven to 400 degrees. Spray three ramekins with nonstick spray and line the bottoms with parchment paper. Set aside.

2. Pour broth into a small pot. Bring to boil than reduce heat to medium-low. Let simmer while you prepare the risotto.

3. Spray a medium pot with nonstick spray and bring to medium heat. Stir in the rice and mushrooms. Cook 2-3 minutes or until mushrooms begin to shrink and rice is toasted.

4. Add a ladleful of broth to the rice. Cook until liquid is absorbed, stirring frequently.

5. Continue adding broth a ladleful at a time and stirring until liquid is absorbed.

6. After adding in the last of the broth, stir in the spinach as well. Continue stirring until spinach begins to wilt and the majority of liquid is absorbed.

7. Stir coconut milk and scallions into the risotto. Season with salt & pepper to taste, then remove from heat.

8. Stir in egg substitute and fresh parsley. Mix well.

9. Divide the mixture evenly between the prepared ramekins and smooth the tops of each.

10. Bake in the oven until tops are just set, 12-15 minutes. Let cool for a few minutes than invert onto serving dish. Remove parchment paper and serve hot or cold.

Wednesday, January 4, 2012

Crazy Good Cold Sesame Noodles

Open Sesame
Hungry Girl's version of sesame noodles is absolutely amazing as well as an interesting change from the normal recipe. When you see the list of ingredients, you may be wary but trust me somehow it all works wonderfully together. I changed the recipe to fit my needs by substituting Miracle Noodles and peanut butter powder but feel free to use regular peanut butter or shirataki noodles. Slurp away!

Crazy Good Cold Sesame Noodles
Gluten Free
Serves 1

Ingredients--
1 package Miracle Noodles (available on Amazon or in health food stores)
1 tbsp. peanut butter powder mix (such as the kind the by FitNutz)
1+ tbsp. water
2 tbsp. Silk PureAlmond unsweetened almond milk
1.5 tsp gluten free soy sauce
1/8 tsp. garlic powder
1 packet Truvia sweetener
1/2 tsp. seasame seeds
2 tbsp. chopped scallions

1. Prepare PB mix by placing powder in a small dish and whisking in 1 tbsp. of water. Add more water if necessary to reach peanut-butter consistency. Set aside.

 2. Rinse and drain noodles well. Pat dry with a paper towel and place in a microwave-safe bowl. Use kitchen scissors to cut noodles into smaller pieces.

3.  Place noodles in a microwave safe bowl and microwave  for 1 minute, then pat dry again. Set aside.

4. In a separate small dish, combine peanut butter, milk, soy sauce, garlic powder, and Truvia. Mix well.

5. Pour sauce over noodles. Stir well. Sprinkle with sesame seeds and scallions and mix again.

6. Allow noodles to chill in the fridge (at least 30 minutes) prior to eating.


Mini Mushroom Pot Pie

Recipe Throwback
Pot Pie has been around since the beginning of time and variations of the dish can be traced back to everyone from the English to the Pennsylvania Dutch. Tonight I created a modern take on the classic that turned out a thousand times tastier than anything you might grab in the freezer section. The great part about this pot pie is that the crust is made of polenta (healthier AND already gluten free). The filling is a tantalizing mix of colorful vegetables that includes squash, mushrooms, and peas.

Mini Mushroom Pot Pie
Gluten Free
Serves 1


Ingredients--
Filling:
2 tbsp. onion, diced
1 garlic clove, minced
4 oz. cremini mushrooms (approx. 6 mushrooms), thinly sliced
1/4 tsp. dried thyme
dash of cayenne pepper
1/4 tsp. cornstarch
1/4 tsp. water
3 tbsp. low-sodium chicken broth
3/4 cup roasted butternut squash cubes (see note below)
1/4 cup petite peas( if frozen, defrost and dry thoroughly)
salt & pepper

Polenta Crust:
3/4 cup low- sodium chicken broth
3 tbsp. gluten free polenta (such as Bob's Red Mill)
1/4 tsp. dried thyme
salt & pepper

1.  Spray a small baking dish (about 18 oz) with nonstick spray and set aside.

2. Spray a medium skillet with nonstick spray and heat to medium-low. Add the onion and cook until soft (about 5 minutes), stirring often. Stir in garlic and cook about 30 seconds more. 

3.  Respray skillet and stir in cayenne and thyme. Add in cremini mushrooms; cook until mushrooms are soften and shrink (12-15 minutes). Respray skillet if mushrooms begin to stick.

4. Meanwhile in a small dish, whisk together cornstarch and water to create a slurry.

5. Once mushrooms are finished cooking, raise heat to medium and add in cornstarch slurry and vegetable broth. Cook until the liquid reduces to about a third (about 5 minutes).

6.  Remove pan from heat and stir in peas and butternut squash. Transfer to prepared baking dish and set aside.

7. To make the polenta crust, bring the chicken broth and salt to boil in a small saucepan. Add the polenta in a fine stream, as you whisk constantly.

8. Turn the heat down to medium, and stir constantly until the mixture thickens, about 8 minutes. Stir in thyme and season with salt and pepper.

9.  Spread polenta evenly over the vegetable mixture. 

10. Bake pie in the oven 13-15 minutes or until polenta begins to brown. Let cool 10 minutes prior to serving.

Nutrition Information--approximately 200 calories per serving


Note-To roast squash, cut into small cubes and place on baking sheet lined with aluminum foil. Spray with nonstick spray and season with salt and pepper. Roast until tender (40-45 minutes) in a 400 degree oven.


Tuesday, January 3, 2012

Thai-Style Tilapia

Under the Coconut Tree
Escape the blustery, frigid temperatures with Thai-Style Tilapa, a delightful dish that will transport you straight to the tropics. A coconut curry broth adds a sunny new twist to plain-jane tilapia in this variation on an Ellie Kreiger recipe.

Thai-Style Tilapia
Gluten Free
Serves Two


Ingredients--
1 garlic clove, minced
1 tsp. curry powder
1/4 cup unsweetened light coconut milk
1 cup low-sodium chicken broth
2 (4 oz) tilapia filets
2.5 cups baby spinach leaves
3/4 cup cooked brown rice (about 1/4 cup uncooked)
1/4 cup parsley, coarsely chopped
1 tbsp. lime juice (fresh if possible)
salt & pepper

1. Spray a medium saute pan with nonstick spray and heat to medium heat. Add garlic and saute until fragrant, about a minute

2. Respray the pan and stir in curry powder. Cook, stirring frequently, for 30 seconds.

3. Add the coconut milk, broth, and a 1/4 tsp salt. Simmer, stirring occasionally, for 5 minutes.

4. Season the tilapia on both sides with salt & pepper. Arrange tilapia in saute pan and spoon broth over top. Cover pan and cook until the fish flakes easily with a fork, 5-7 minutes.

5. In the meantime, place the spinach in a microwave safe bowl, cover tightly and microwave for 1 minute and 30 seconds (or until steamed thoroughly).

6. Divide the brown rice between two shallow bowls. Top rice with cooked spinach. Place one tilapia filet on each portion.

7. Stir the parsley and lime juice into the sauce. Season to taste with salt and pepper. Ladle the sauce evenly over tilapia filets and serve.

Nutrition Information--approximately 250 calories per serving